Update Prices Without Reprinting
A restaurant prints 50 table tents with QR codes for their menu. Seafood prices change weekly. Instead of reprinting menus, they just update the digital menu - all 50 QR codes now show the new prices. A dish runs out? They toggle it off. Seasonal special? They add it with one click.
Menu QR codes create a beautiful digital menu - categories, photos, prices, allergen labels, opening hours, and (optionally) a full WhatsApp ordering flow with cart and table numbers. All in one scannable code, no app download for the customer.
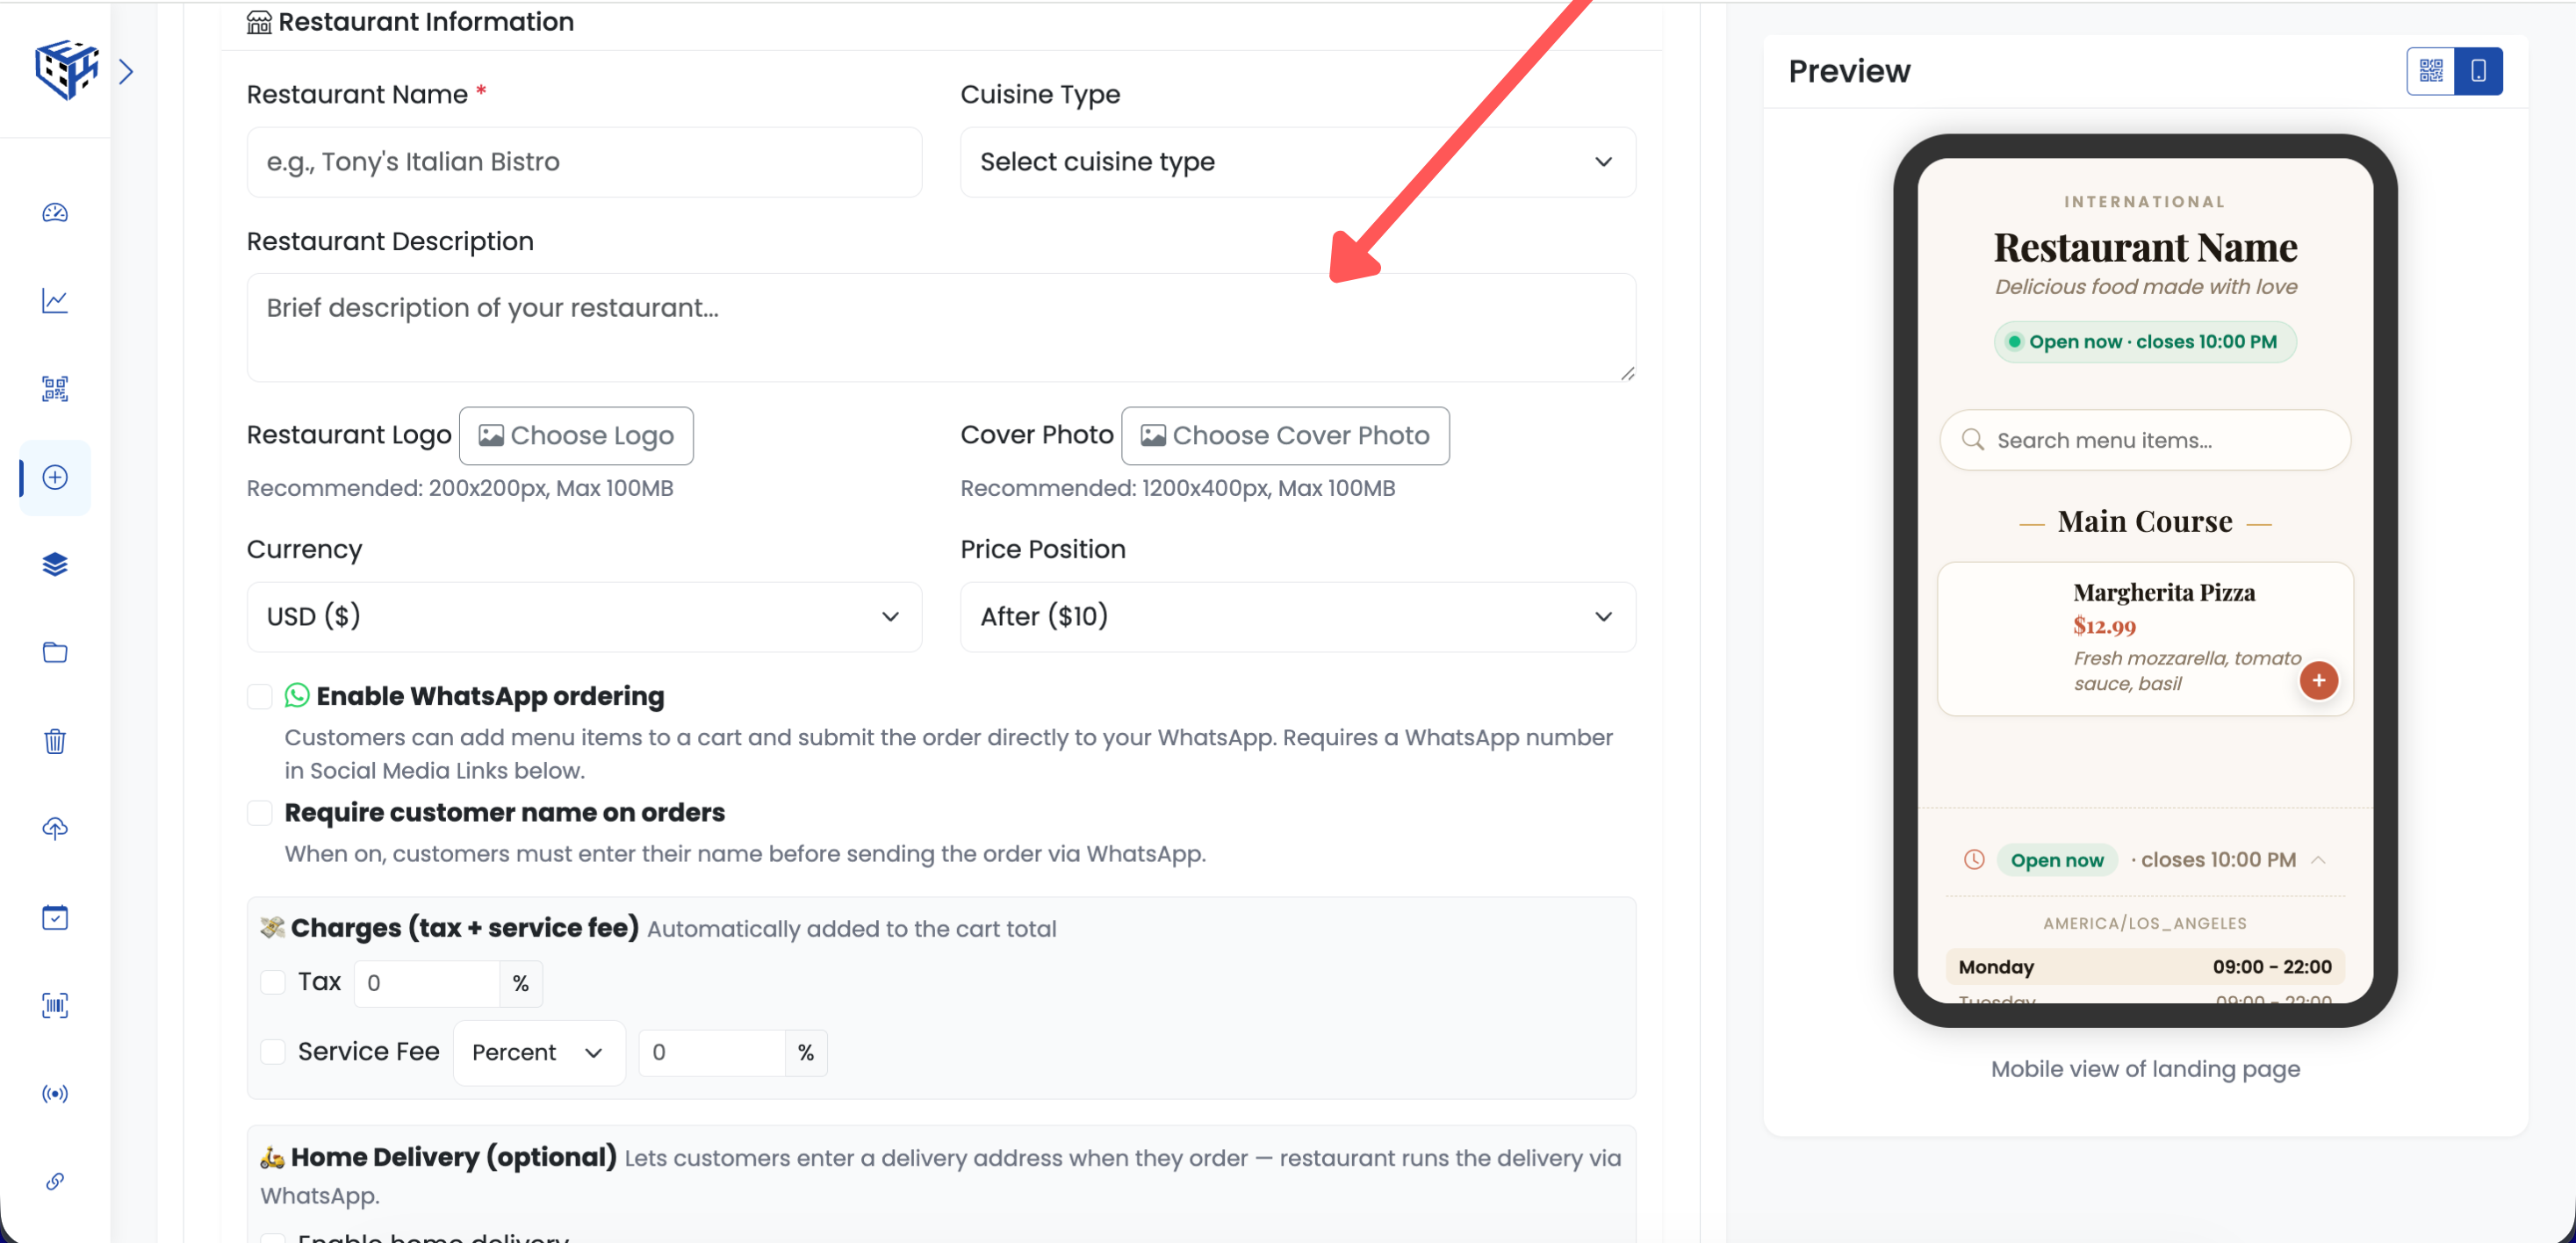
The Menu QR editor — start here to build your menu
What Visitors See
A mobile-first menu with a warm editorial look. The hero shows your cover photo with your logo half-overlapping the photo edge, followed by the cuisine tag, restaurant name, a short italic tagline, an Open now / Closed status pill that auto-computes in your timezone, and quick-action chips for Call, Directions and Website. Below that, a sticky search bar stays pinned as customers scroll. Every dish is its own card with a photo thumbnail, name, price, a short description, green dietary pills (Vegetarian, Vegan, Halal, Keto, etc.) and red allergen pills with a ⚠ CONTAINS label so diners never miss them. Items marked Popular or Chef's Special get a small gold ★ badge and gold border. No app download needed.
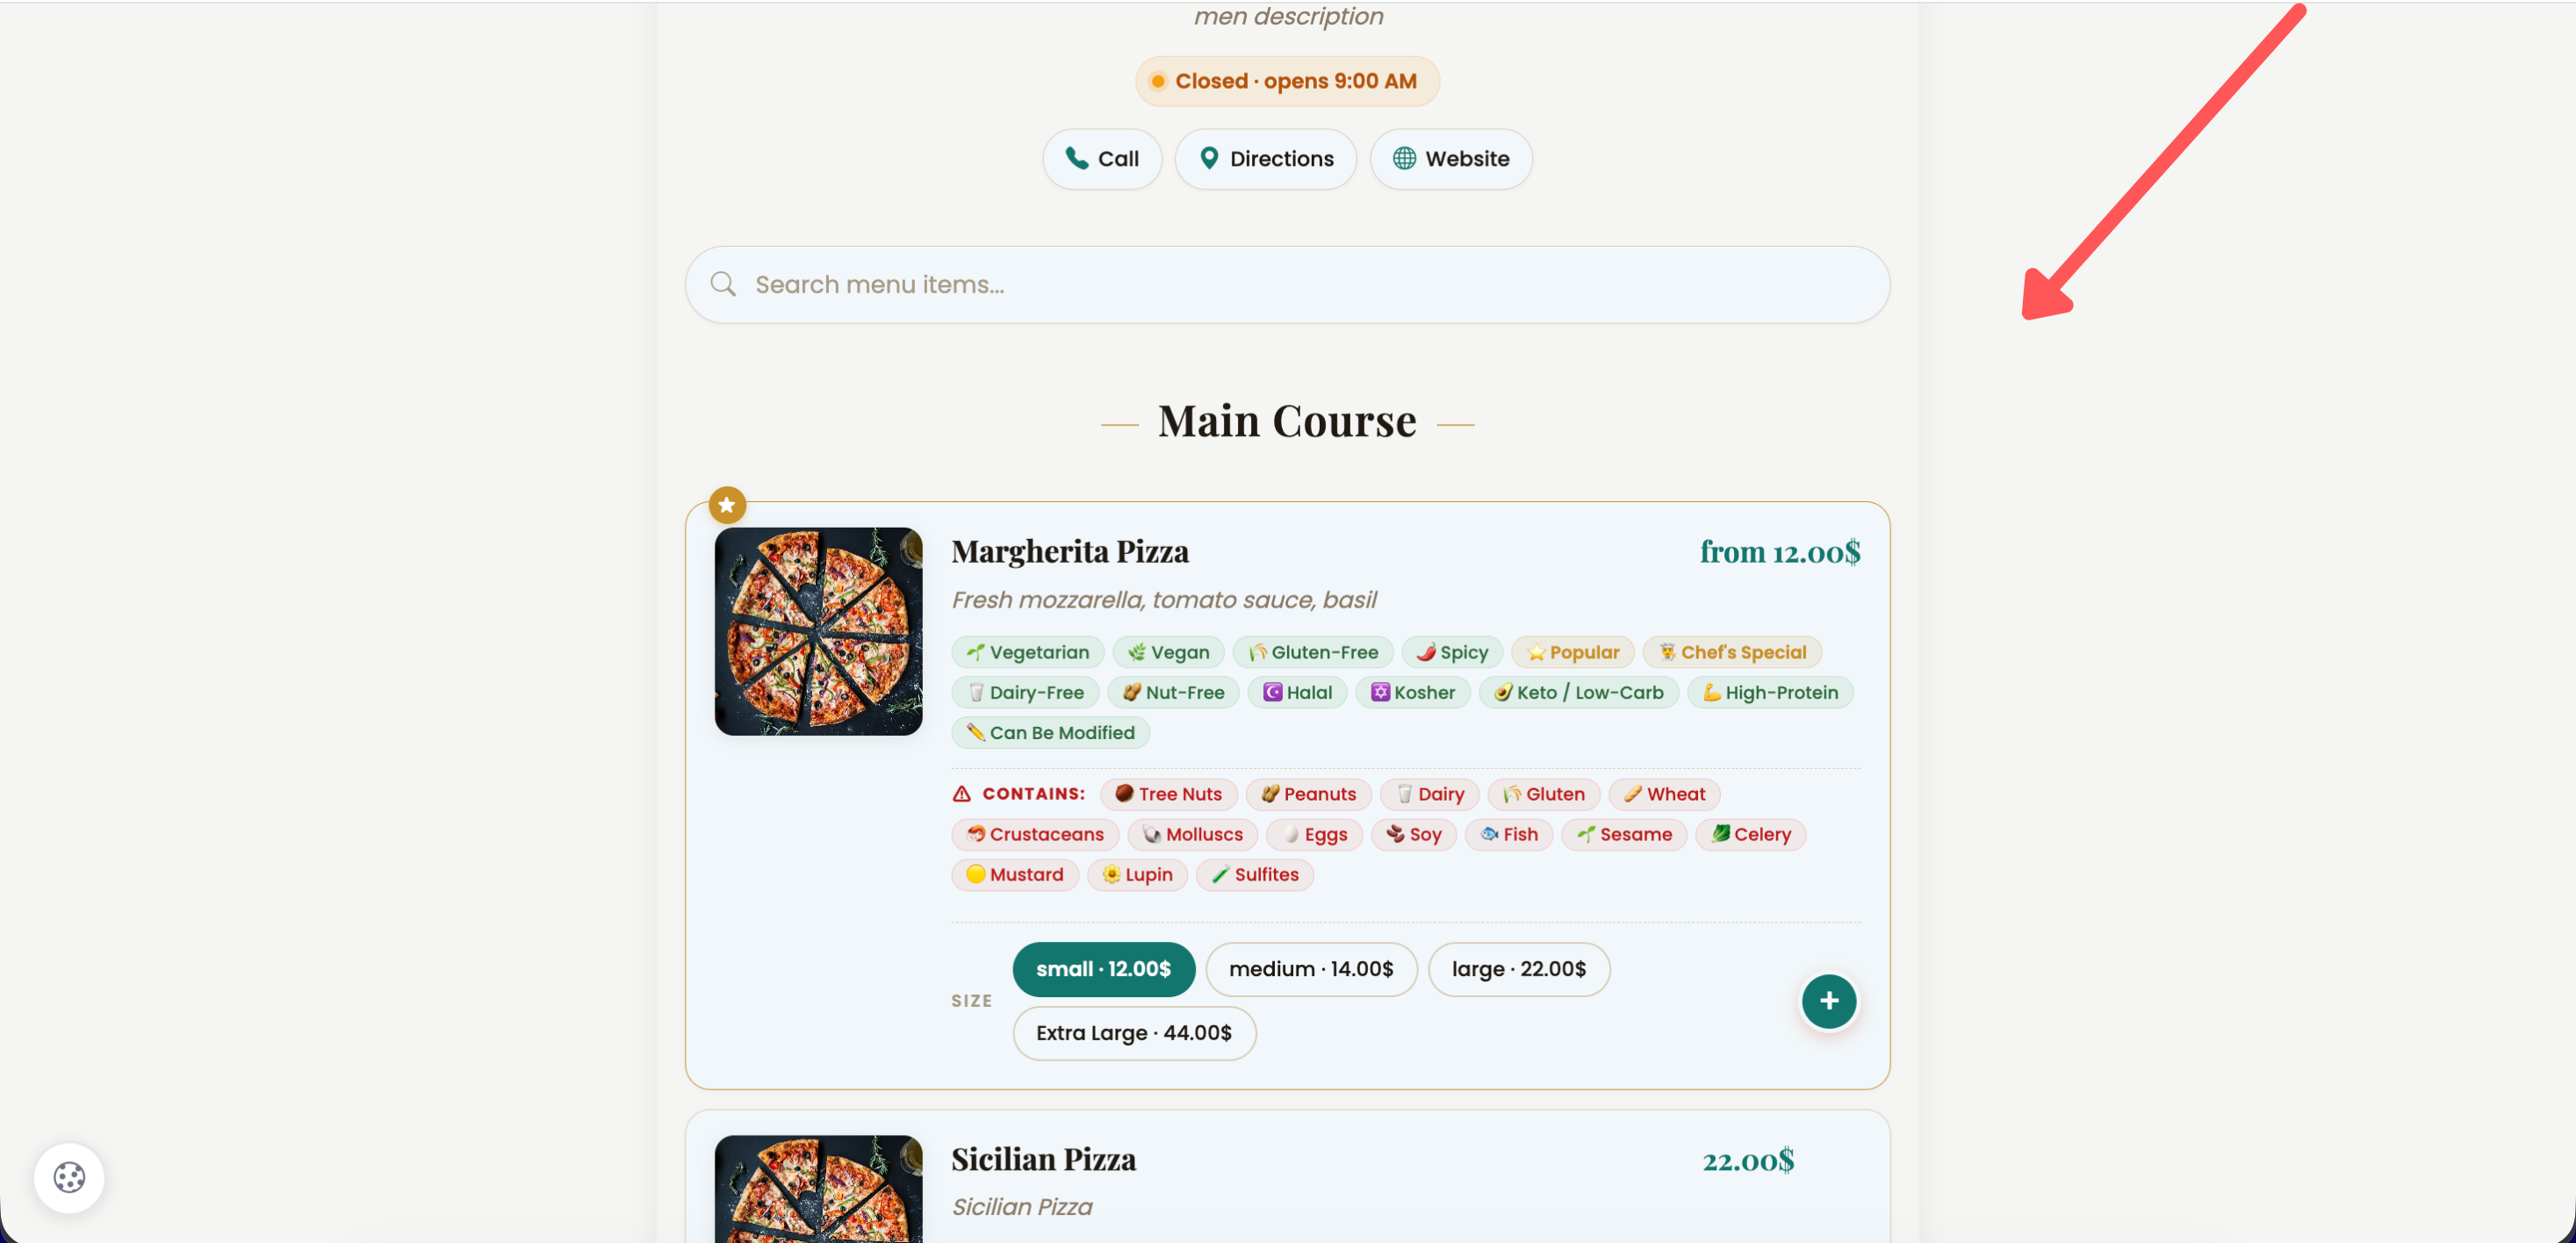
Menu with categories, items, and floating cart button
Restaurant Information
| Field | Description | Limit |
|---|---|---|
| Restaurant Name* | Your restaurant name | 100 characters |
| Cuisine Type | American, Asian Fusion, Bakery, BBQ, Brazilian, Cafe, Chinese, Dominican, Fast Food, French, Greek, Halal, Hibachi Grill, Indian, Italian, Japanese, Korean, Mediterranean, Mexican, Polish, Soul Food, Spanish, Thai, Turkish, Vietnamese, Other | - |
| Description | About your restaurant | 300 characters |
| Logo | Restaurant logo | 200x200px, 2MB |
| Cover Photo | Header image | 1200x400px, 20MB |
| Currency | USD, EUR, GBP, INR, JPY, CAD, AUD, CNY, BRL, AED, SAR, THB, SGD, MYR, IDR, PHP, KRW, ZAR, NGN, EGP, SEK (21 currencies) | - |
| Price Position | Before ($10) or After (10$) | - |
Prices are formatted to match the currency you pick. Indonesian Rupiah shows as Rp45.000 (no decimals, dot thousands) the way locals expect, Euro shows as 45.000,00 with a comma decimal, Swedish Krona as 1 234,56 kr (space thousands, comma decimal), USD as 45,000.00, and yen and won have no decimals at all. You enter the raw number — the menu, the cart breakdown, and the WhatsApp order all render it correctly for the chosen currency.
Menu Categories & Items
Create multiple categories (e.g., Appetizers, Main Course, Desserts) and add items to each. Every item can be enriched with the following options:
| Field | Description |
|---|---|
| Item Name* | Name of the dish |
| Price* | Item price |
| Image | Photo of the dish (20MB max) |
| Description | Ingredients or details |
| Dietary Tags | Vegetarian, Vegan, Gluten-Free, Spicy, Popular, Chef's Special, Dairy-Free, Nut-Free, Halal, Kosher, Keto / Low-Carb, High-Protein, Can Be Modified |
| Allergens | Tick what the dish CONTAINS: Tree Nuts, Peanuts, Dairy, Gluten, Wheat, Crustaceans, Molluscs, Eggs, Soy, Fish, Sesame, Celery, Mustard, Lupin, Sulfites (covers all 14 EU Regulation 1169/2011 allergens plus US FDA Wheat) |
| Variants (sizes) | Optional sizes with their own prices (e.g. Small $8, Medium $12, Large $16). Menu shows 'from $8' and customer picks a size before adding to cart. |
| Scheduled visibility | Show item only during Breakfast, Lunch, Dinner, or a custom day + time window (e.g. Happy Hour Mon-Fri 4-7 PM). Auto-hides outside hours. |
| Available | One-click toggle when an item is sold out. Customers see a strikethrough price and an 'Unavailable' badge, and can't add it to the cart. |
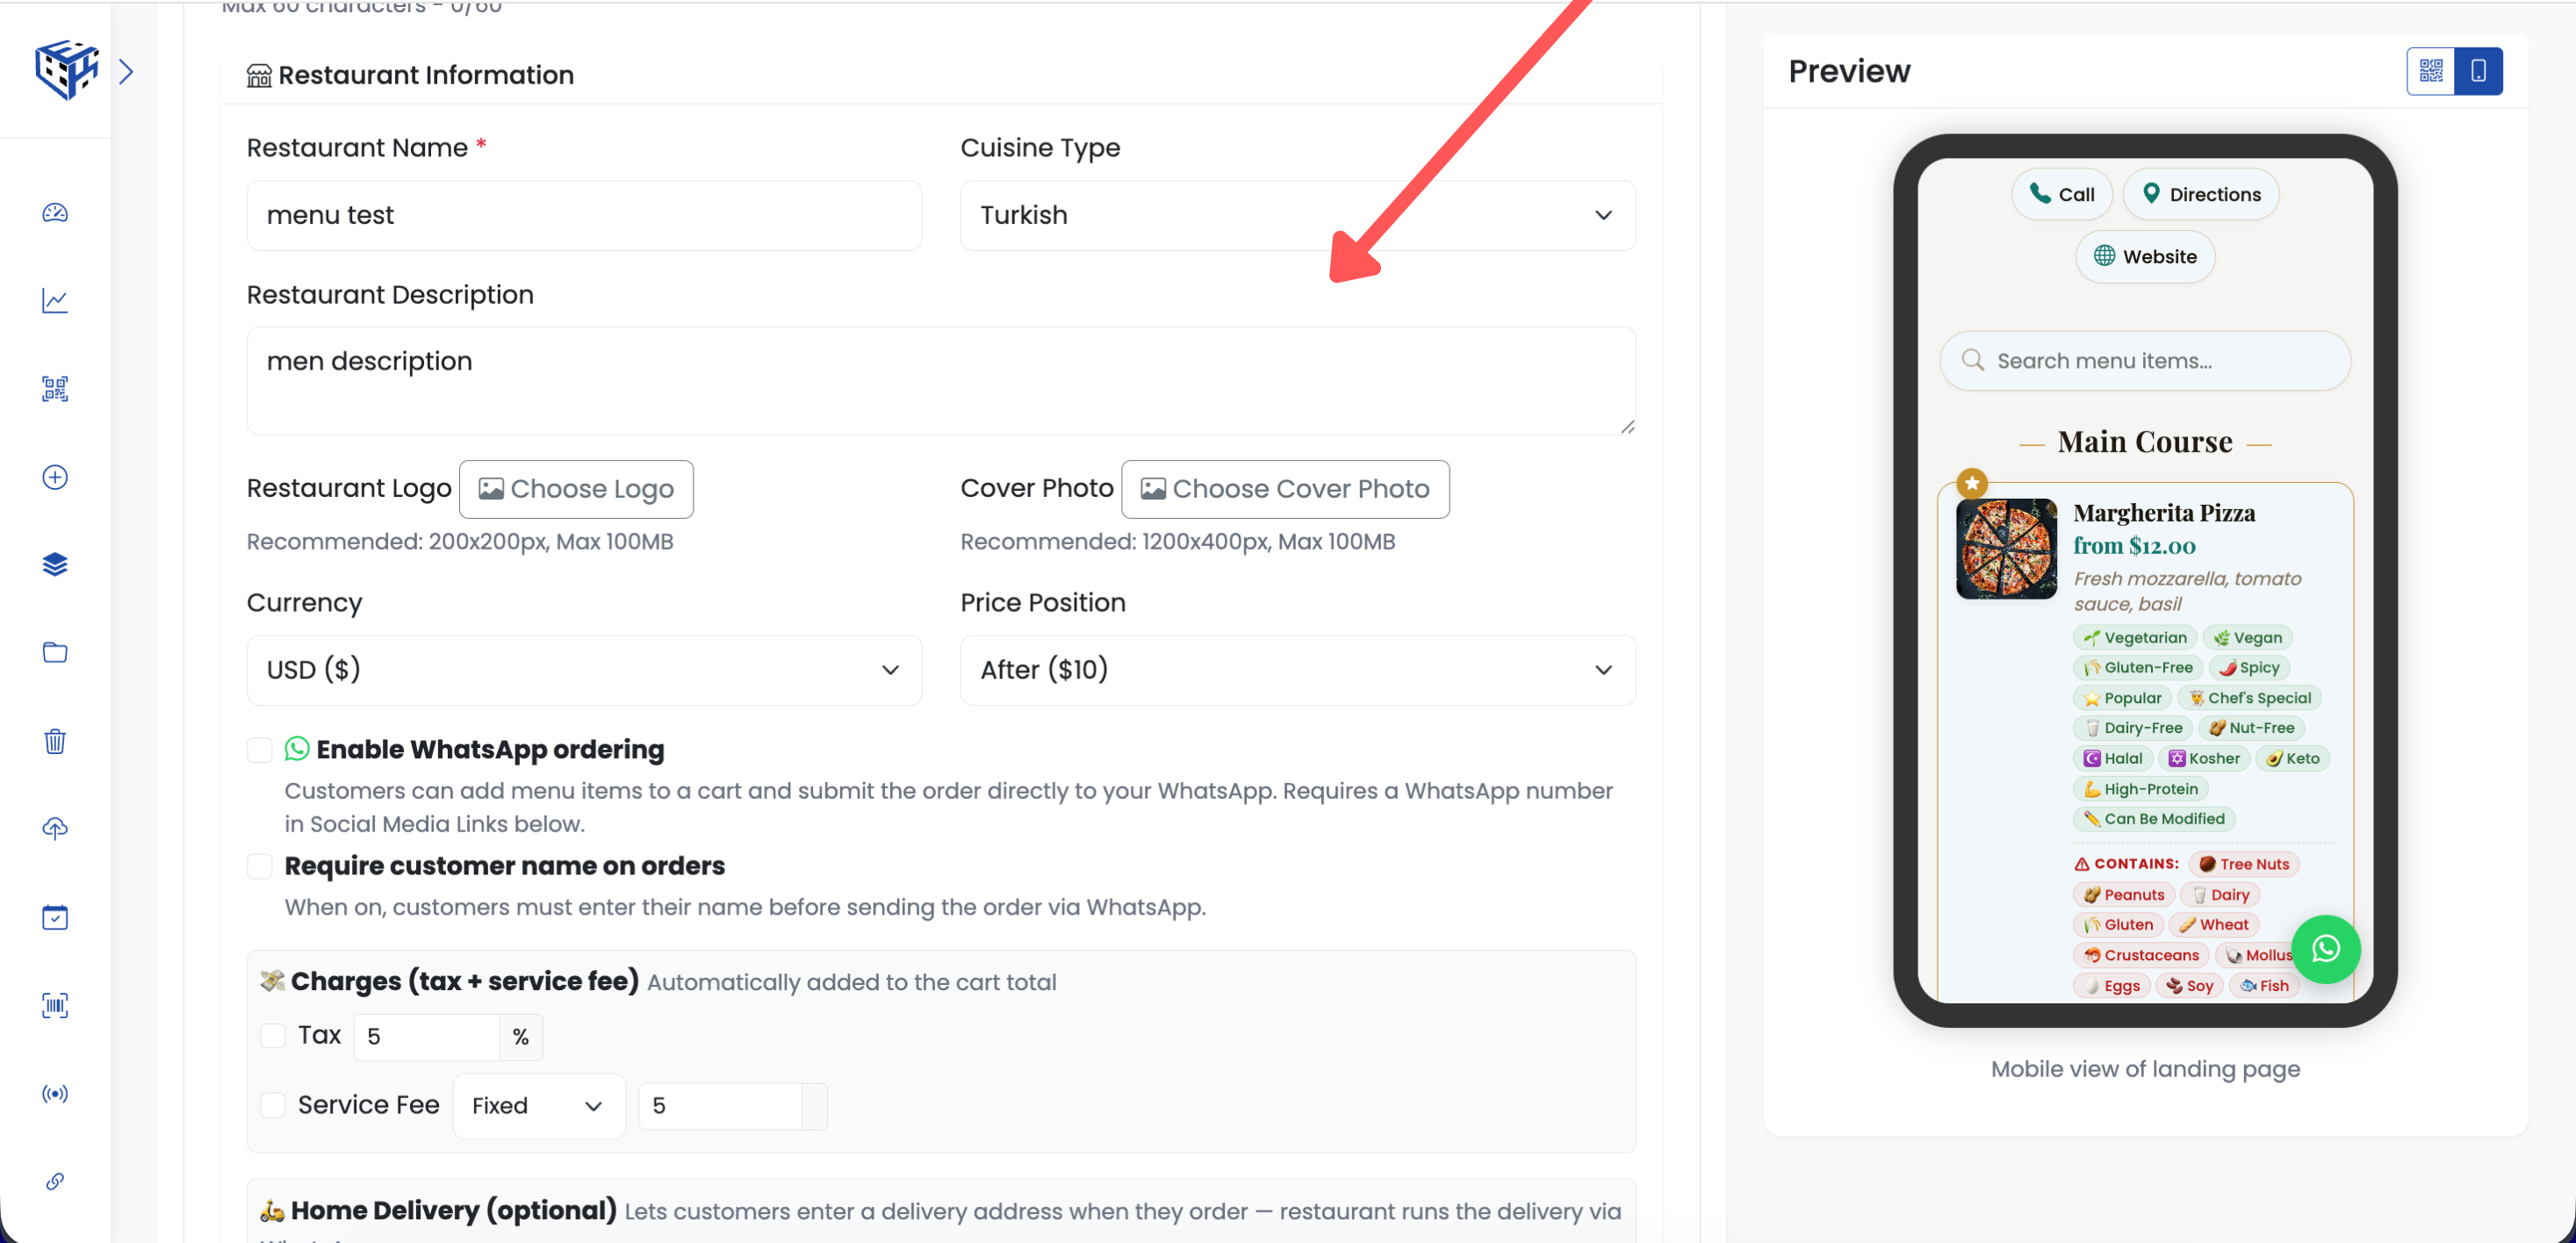
Top of the item editor — basic info and dietary tags
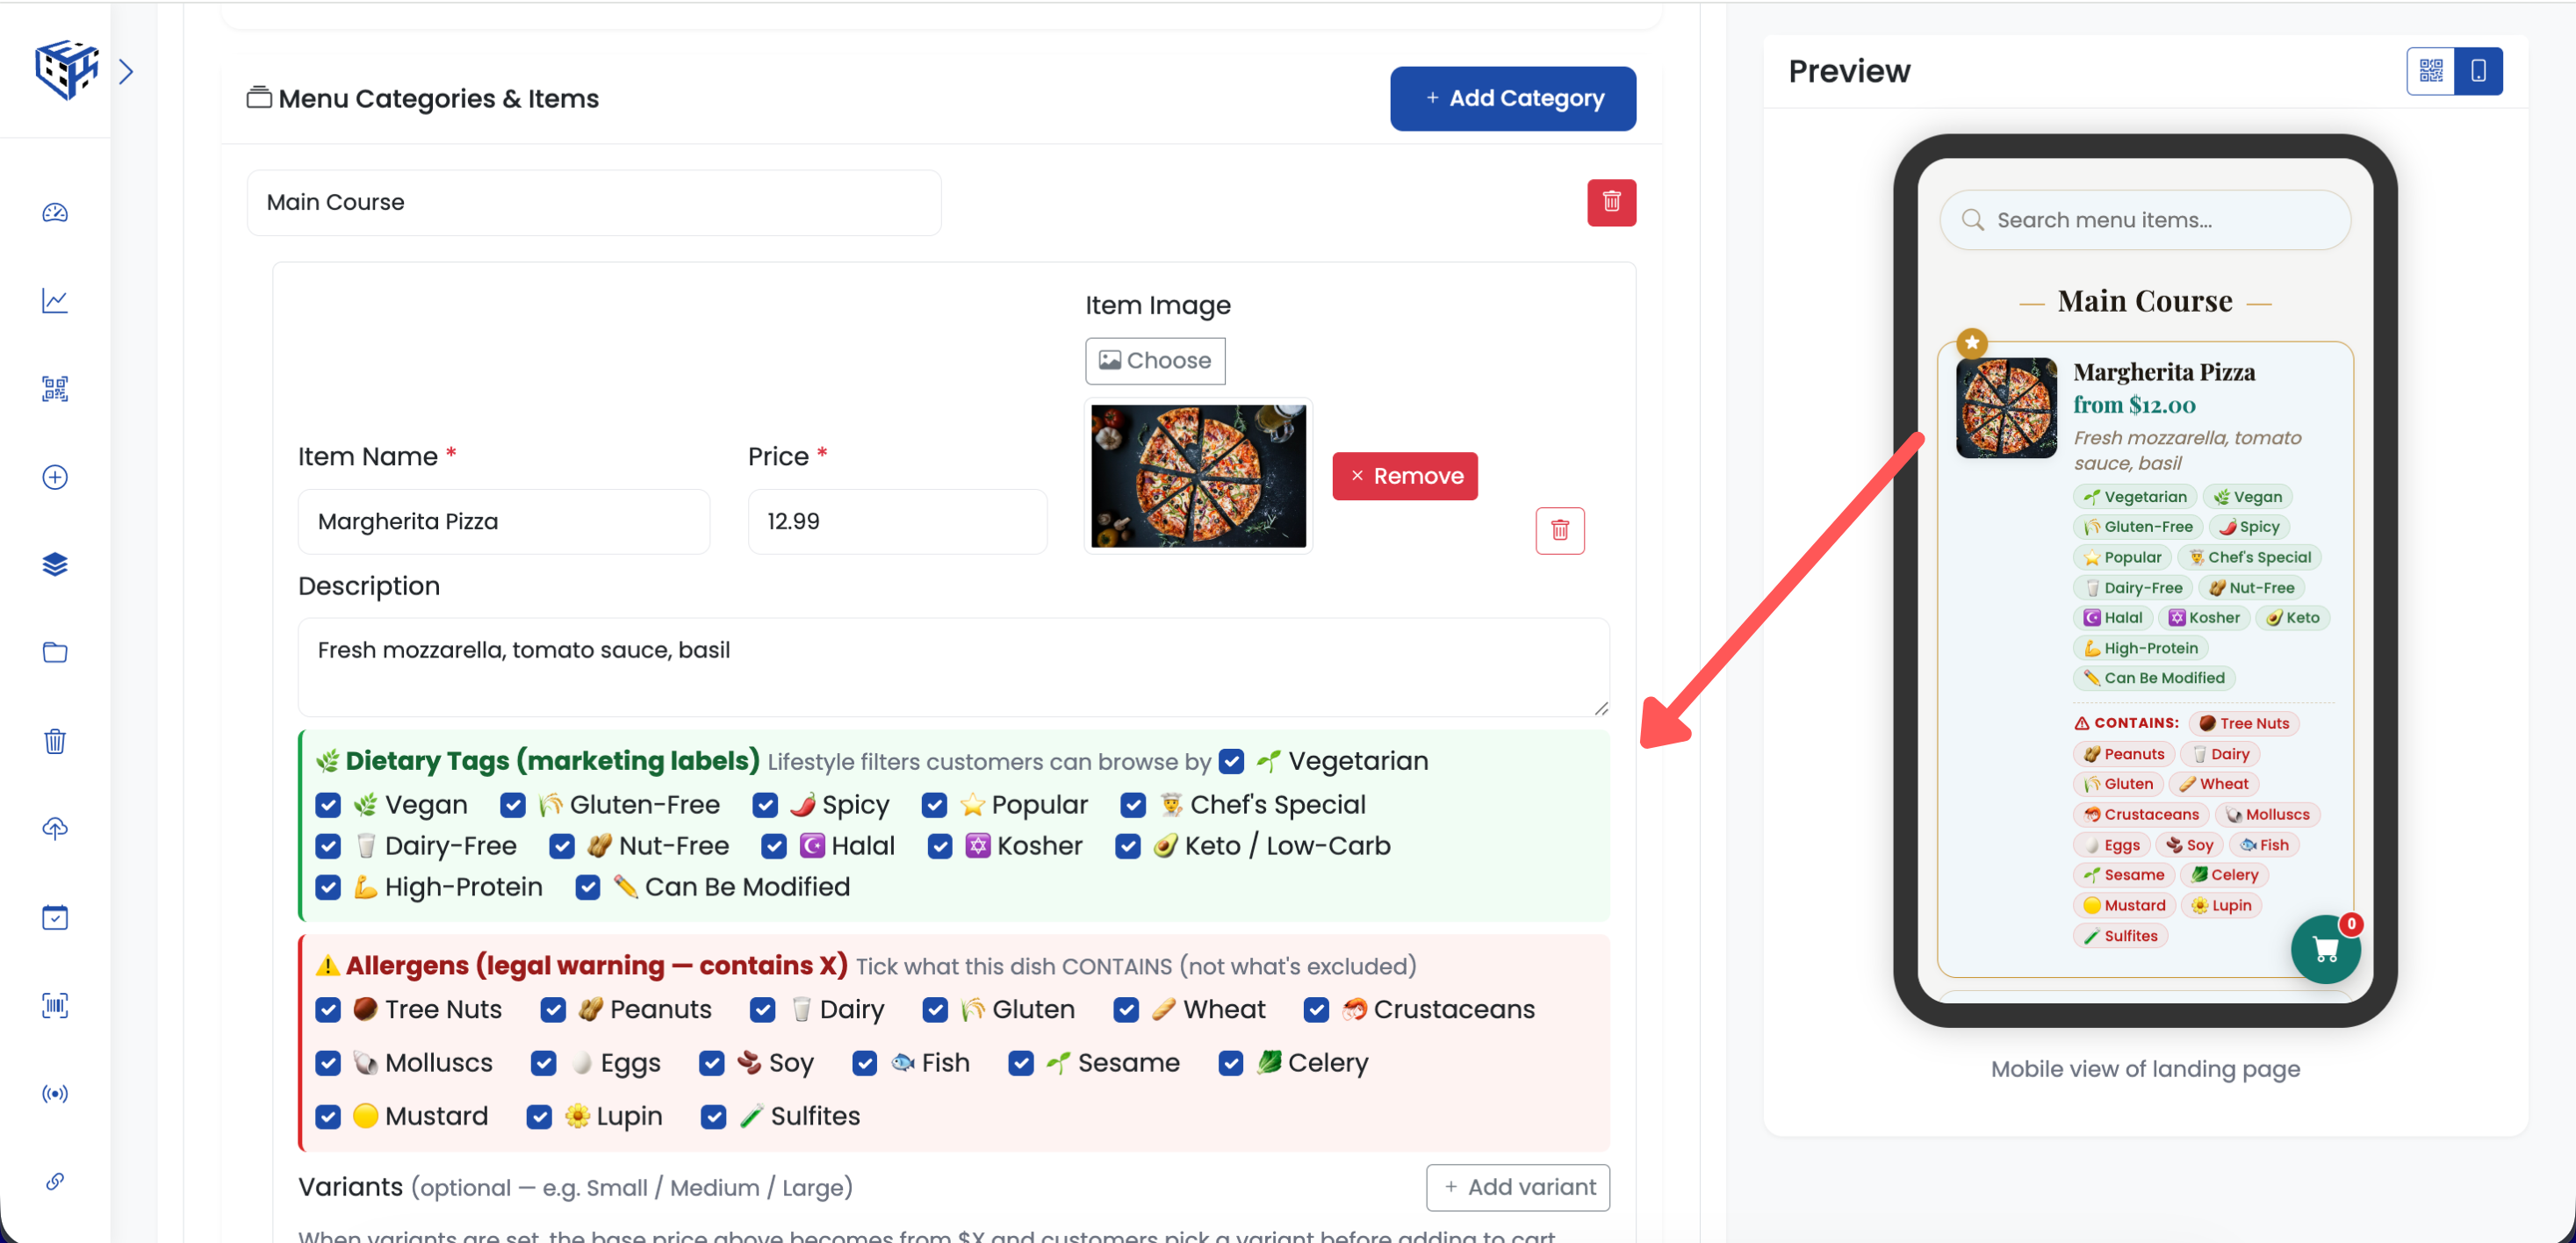
Tick every allergen the dish contains — 14 EU + US FDA Wheat
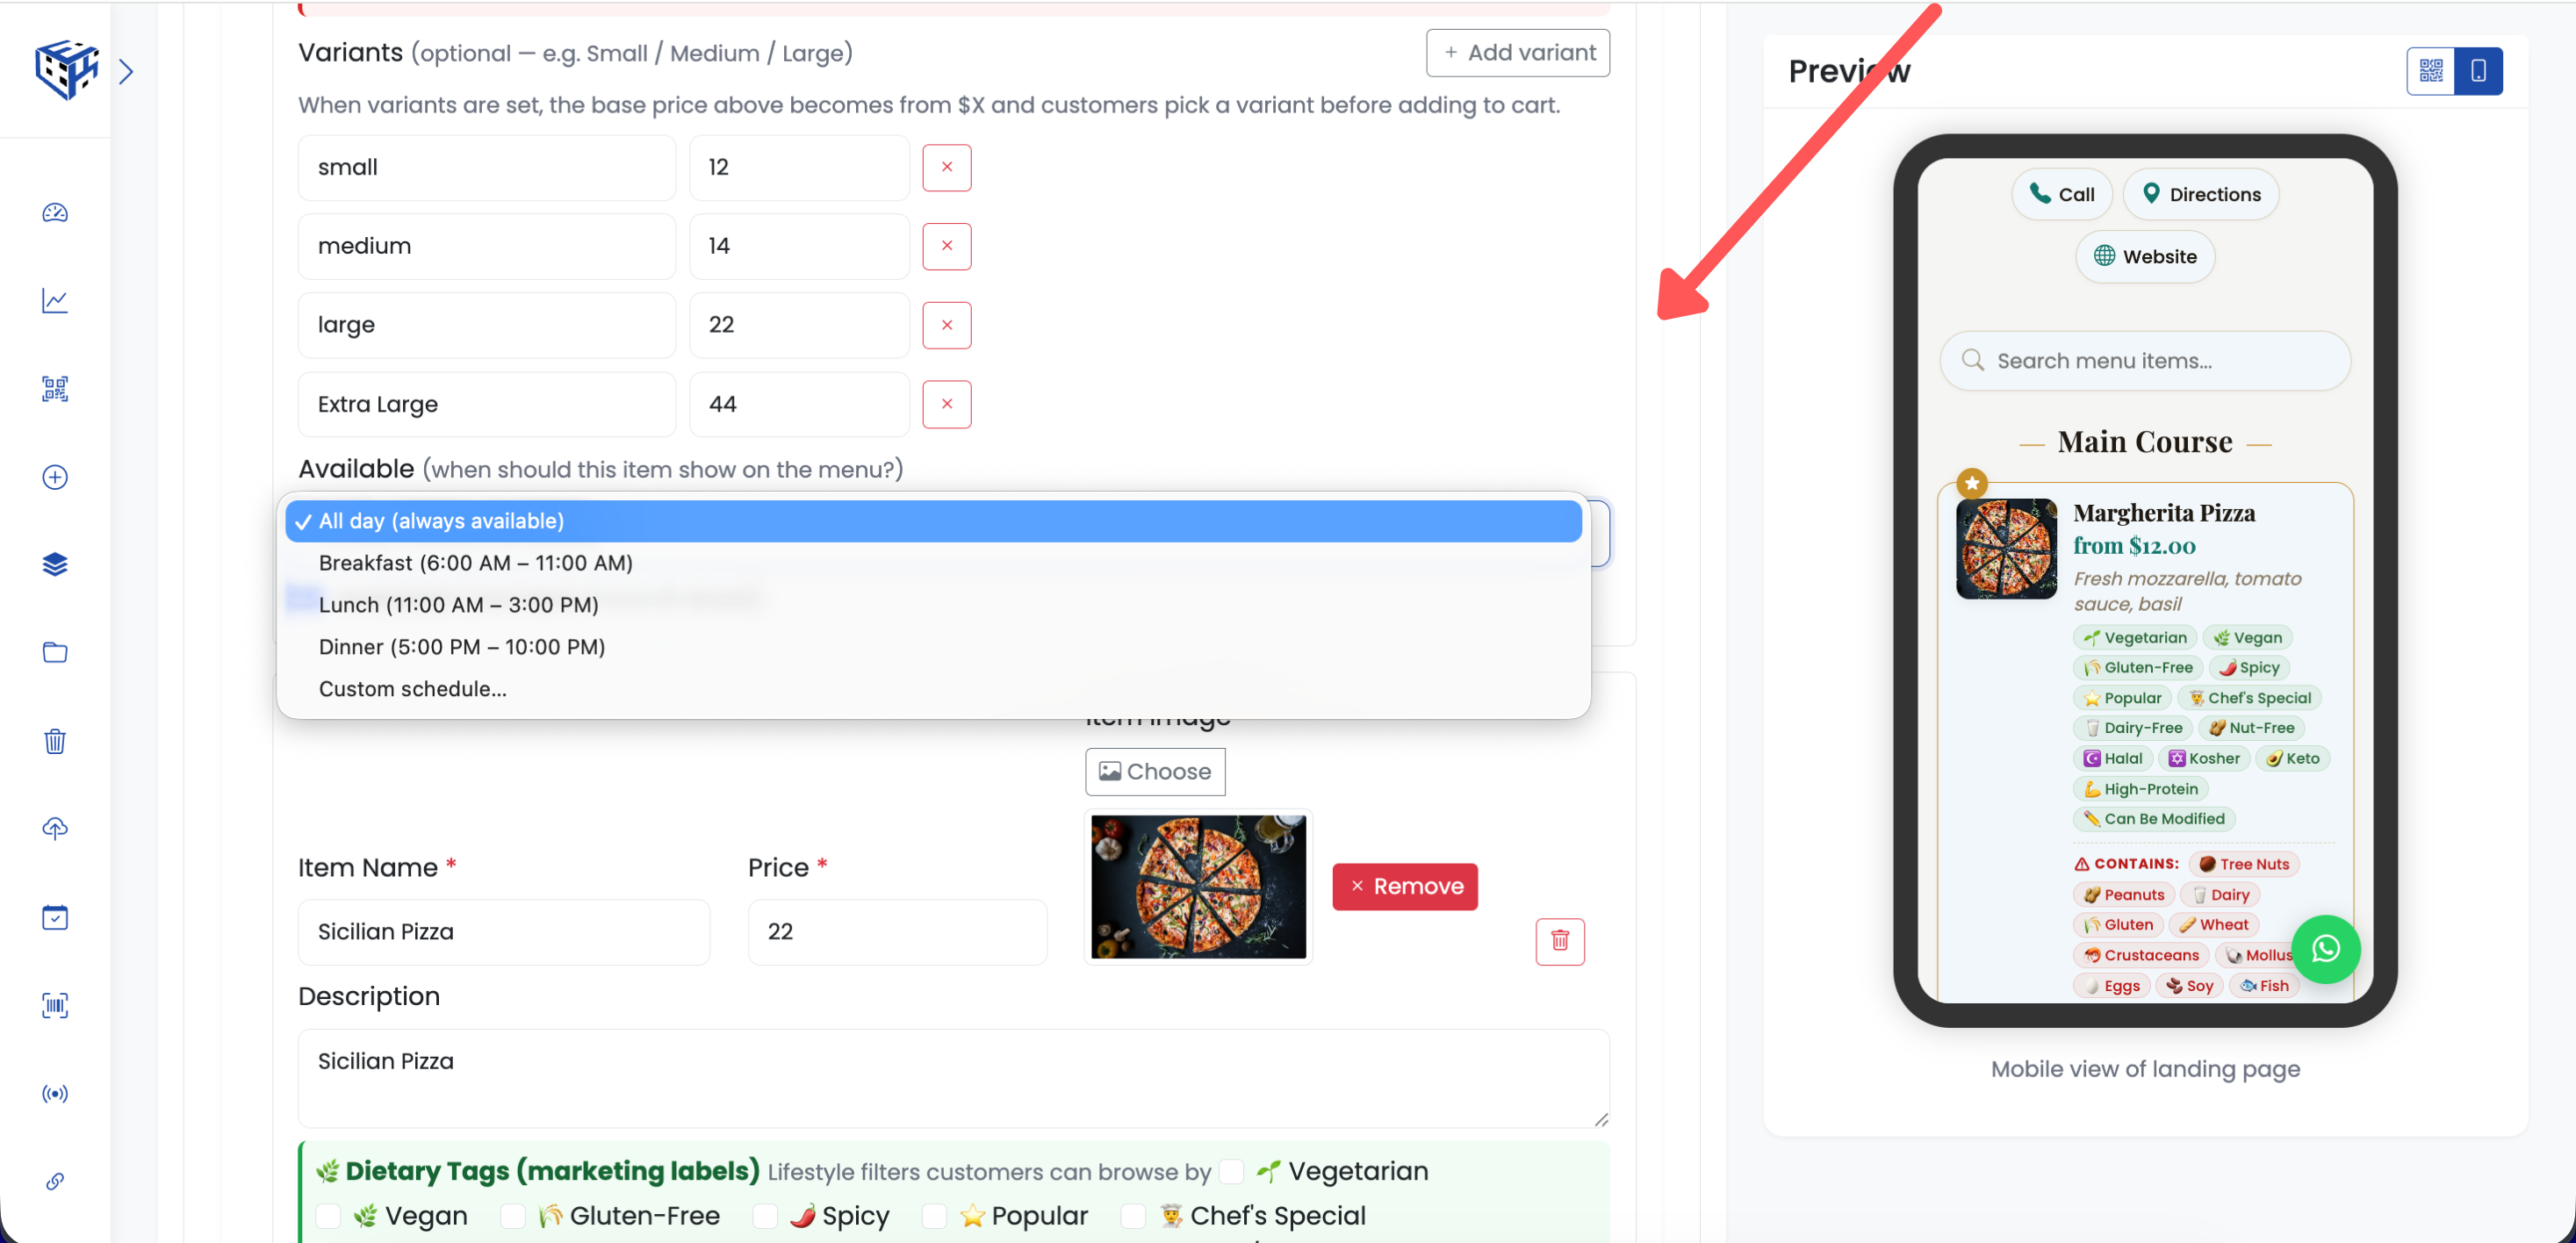
Sizes, time-based availability, and the sold-out toggle
WhatsApp Ordering (Optional)
Turn your menu into a full order form. Customers tap + on dishes they want, review the cart, enter their table number, and send the order straight to your WhatsApp. No app install, no delivery platform commission, no middleman.
| Step | What to do |
|---|---|
| 1 | Open Edit on your Menu QR |
| 2 | In the Restaurant Information section, turn on Enable WhatsApp ordering |
| 3 | (Optional) Turn on Require customer name on orders if you want every order to include a name |
| 4 | (Optional) Open the 💸 Charges panel below to configure Tax or Service Fee |
| 5 | Scroll down to the Social Media Links section |
| 6 | Enter your WhatsApp number with country code (e.g. +44 7700 900123) |
| 7 | Save — the cart button appears on every scan from now on |
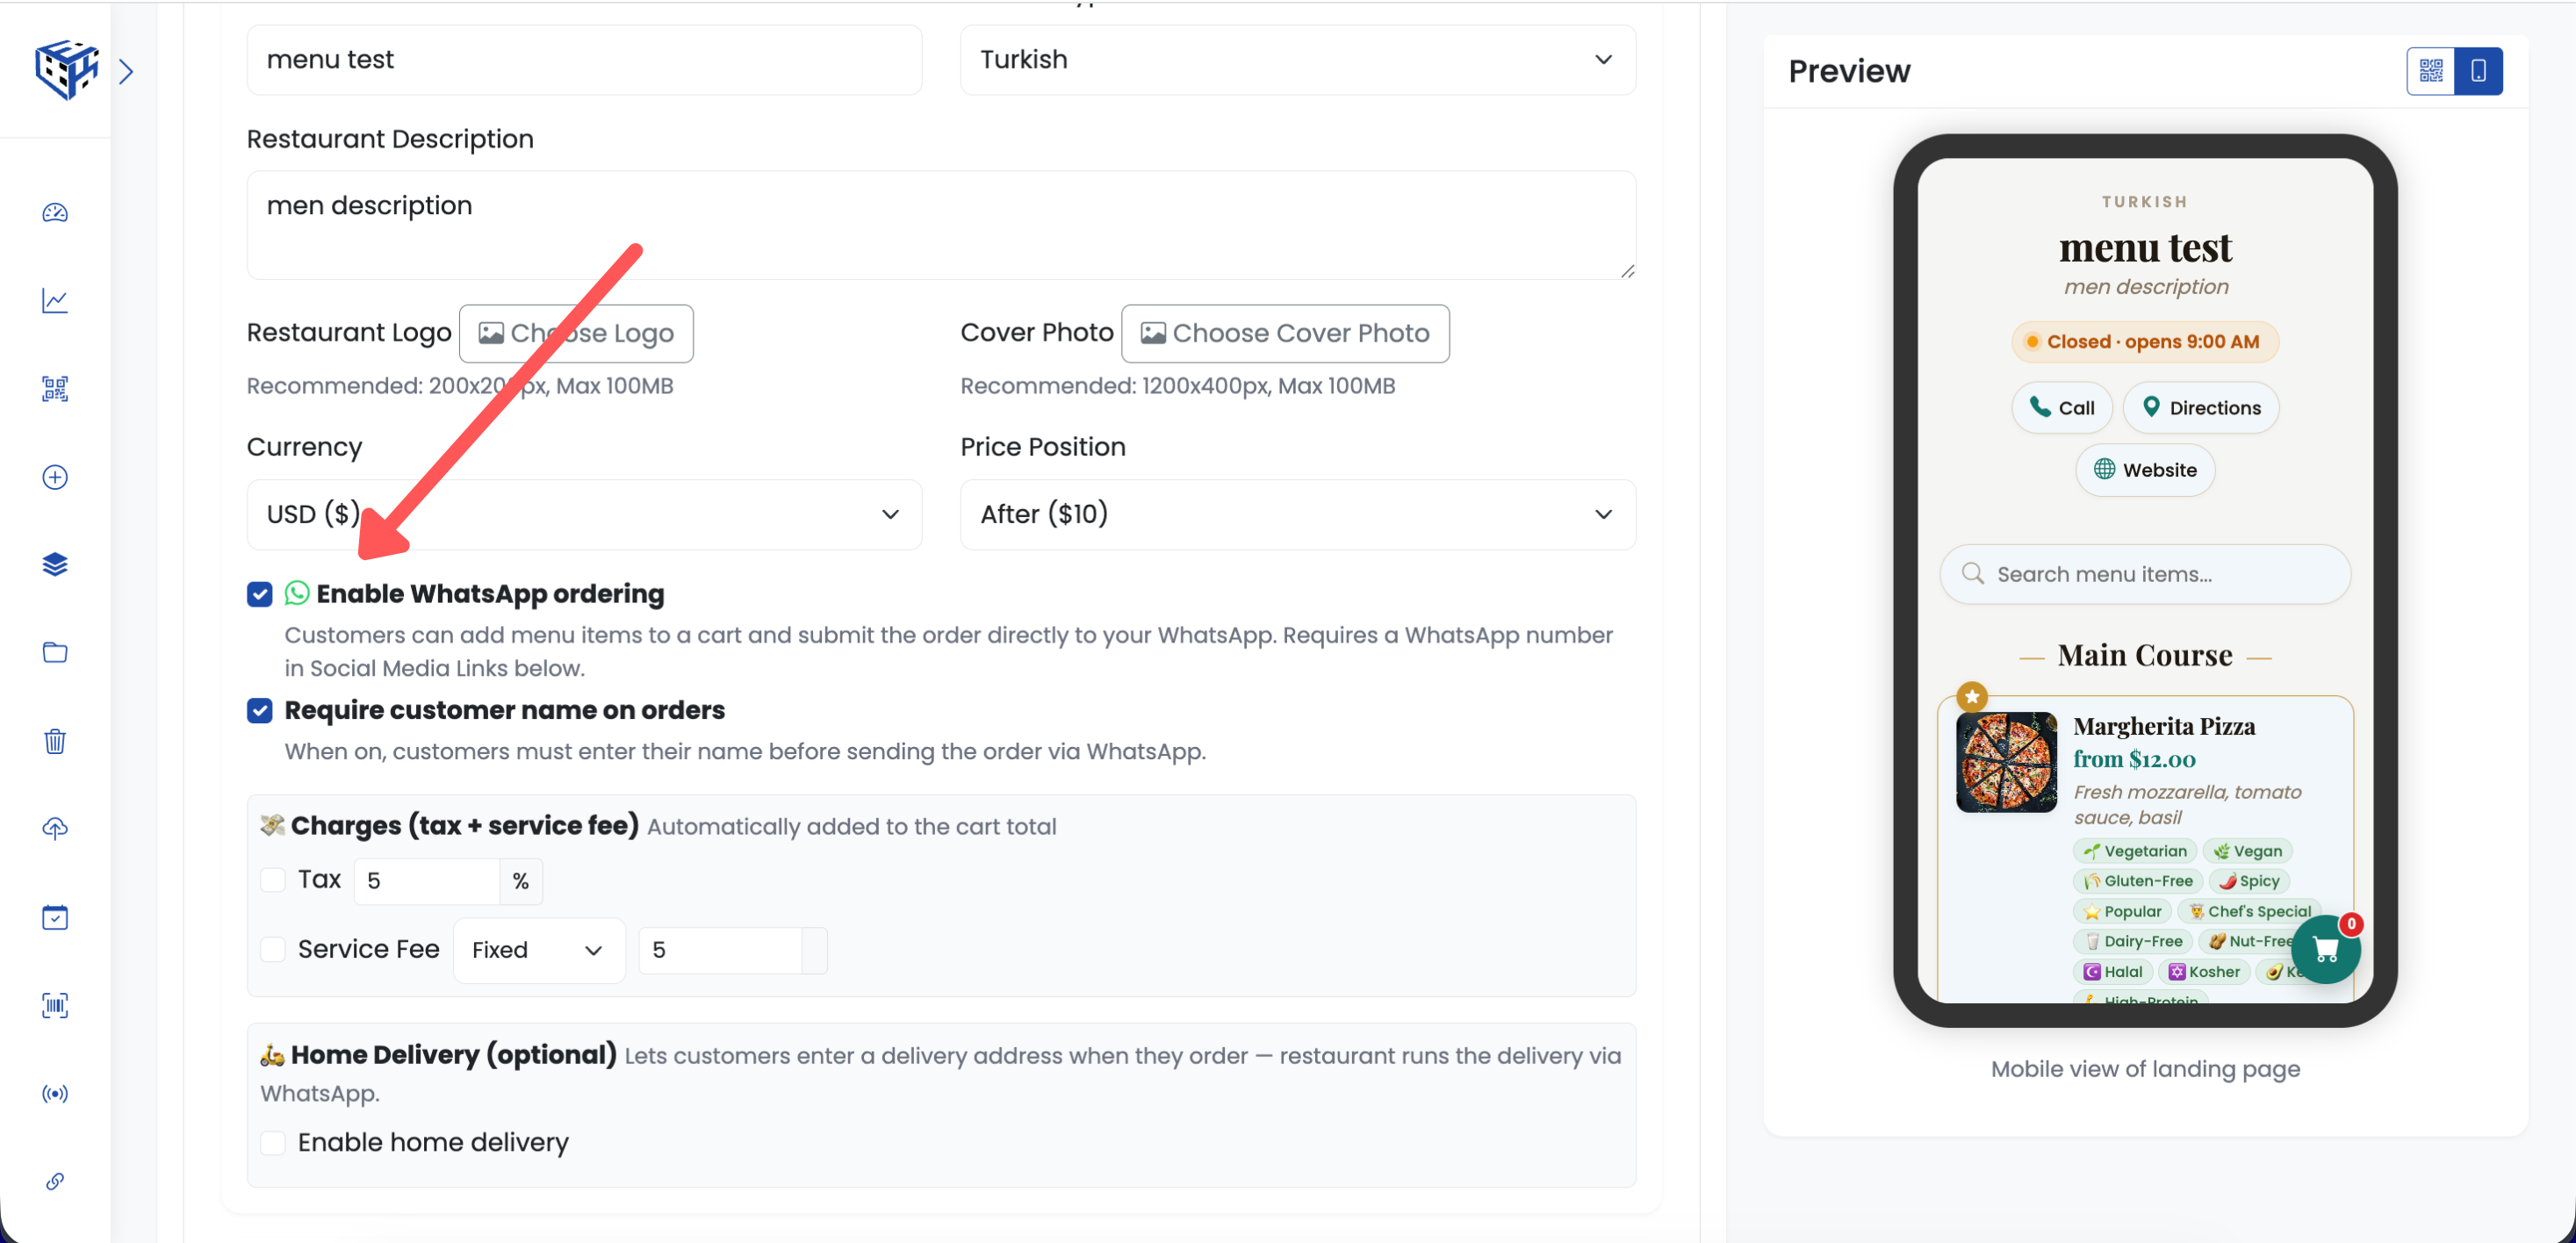
Enable ordering and set your WhatsApp number
What Customers Experience
A floating cart button sits at the bottom corner of the menu. Tapping + on a dish adds it to the cart and shows a red badge with the item count. Tapping the cart opens a full-screen checkout that slides in, laid out in sections: Items (each line with a photo thumbnail, name, quantity stepper and subtotal), Pickup Details (table number, customer name, special instructions — each with a matching icon), and Summary (Subtotal, Service Fee and Tax if enabled, Total, and the big green Order via WhatsApp button inside the same panel). On desktop the three sections sit side-by-side; on mobile they stack vertically. One tap on the Order button sends the whole order straight to your WhatsApp.
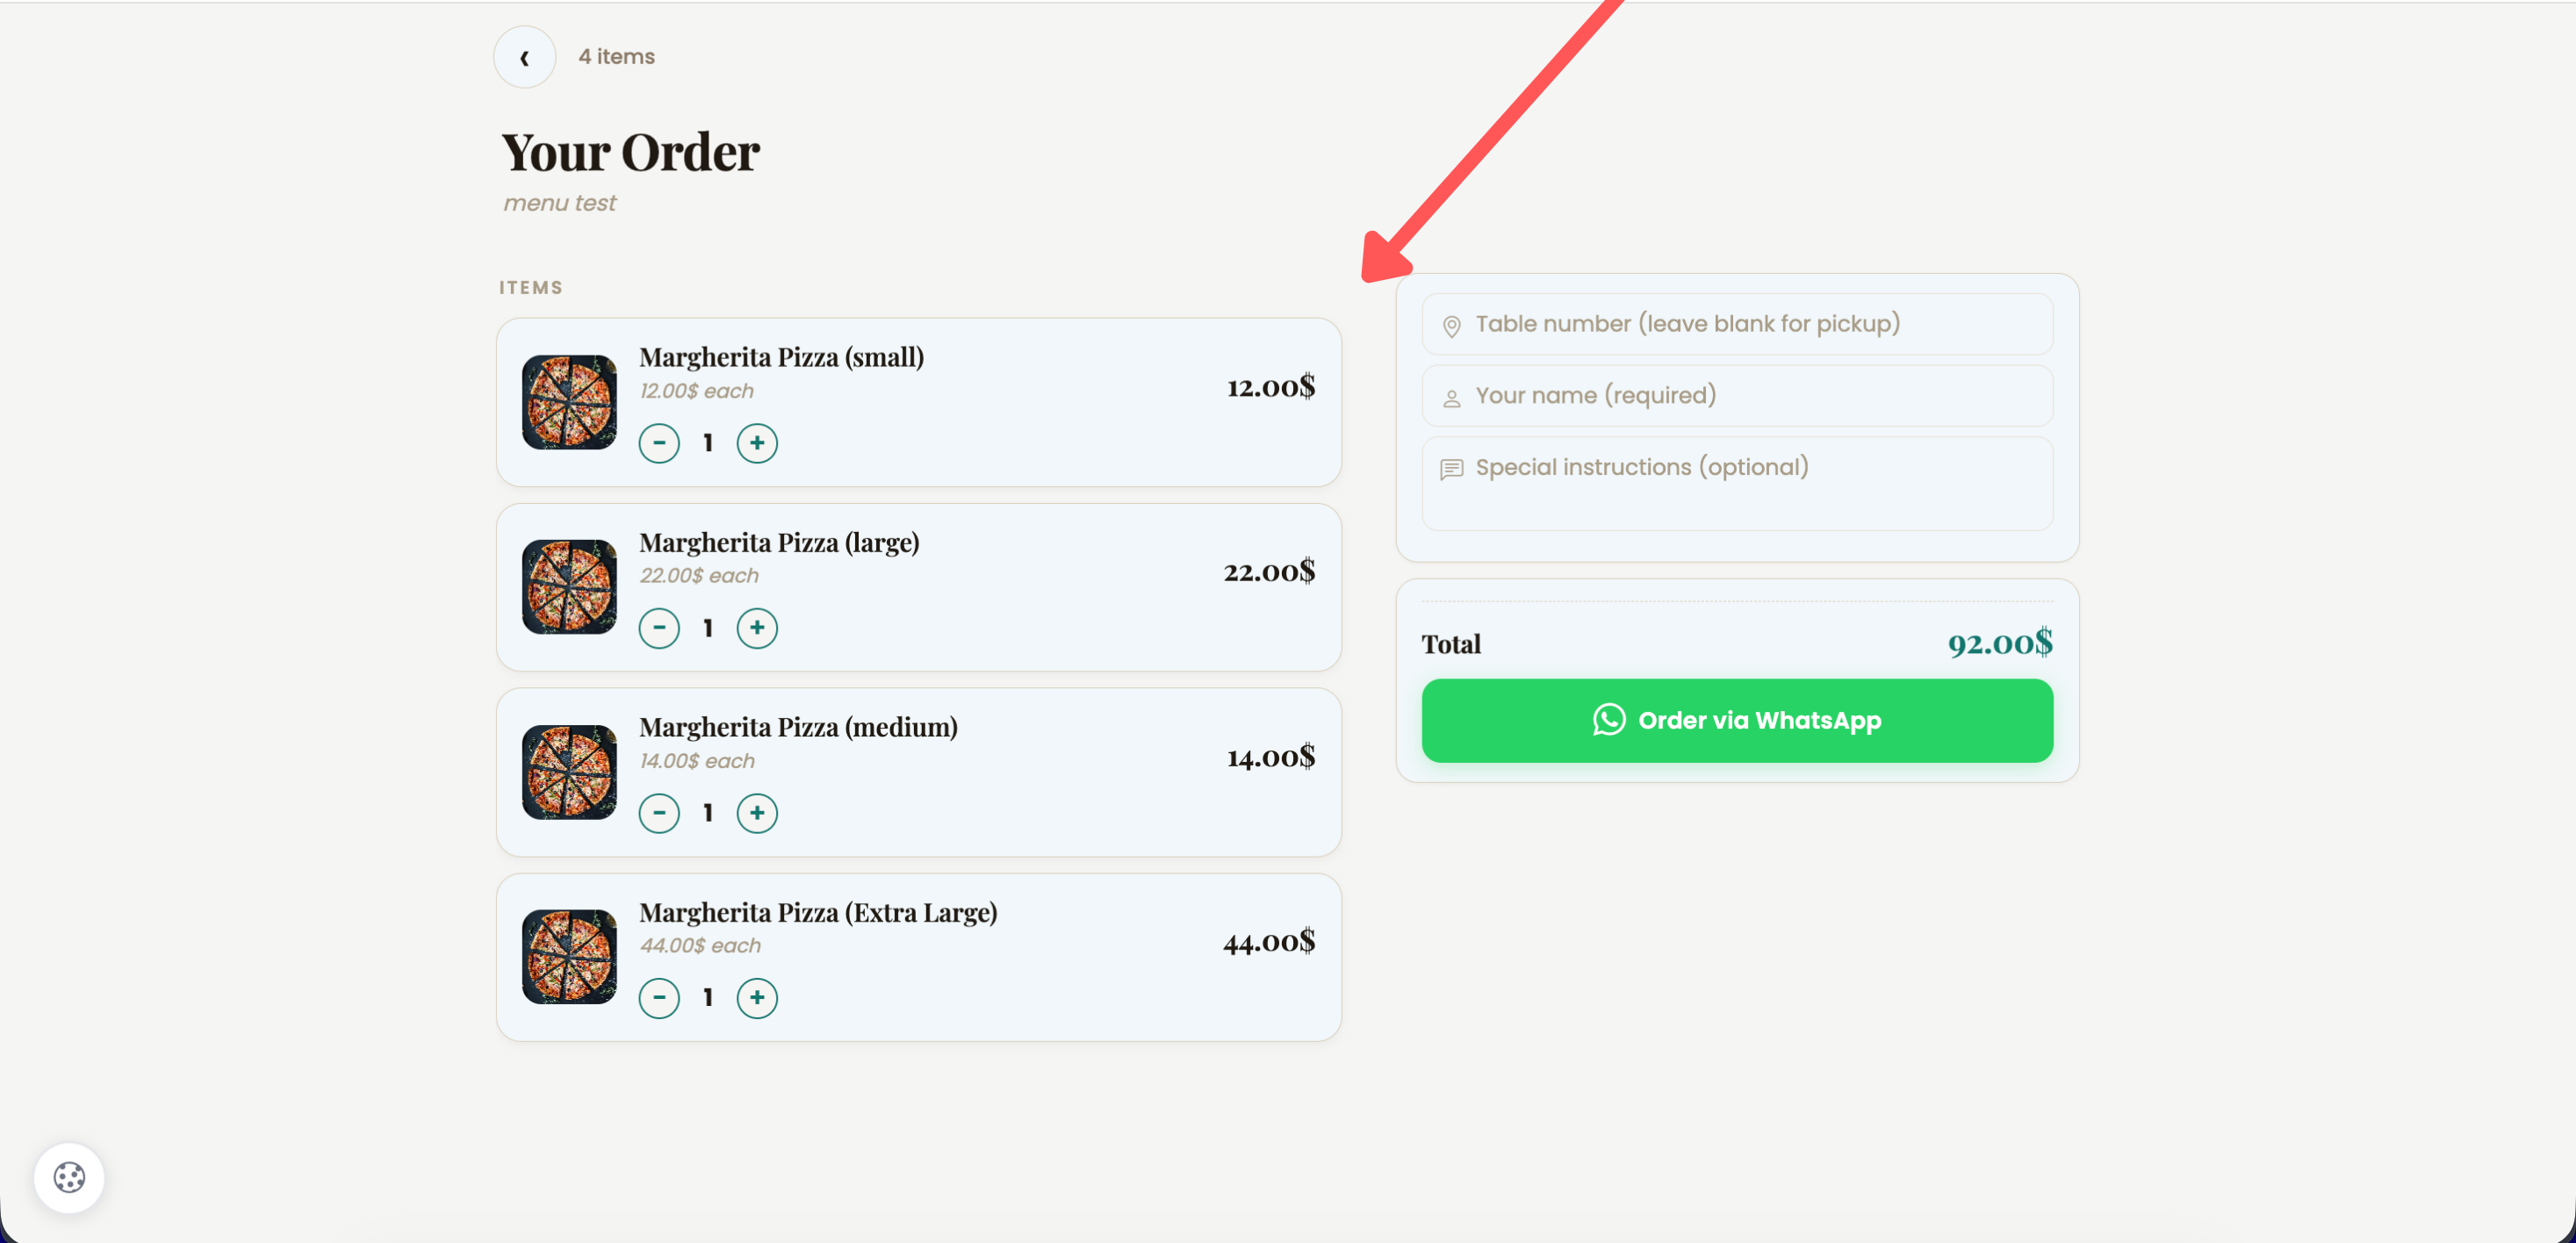
Full-screen checkout with sections for items, pickup details, and summary
The Order You Receive
The order lands in your WhatsApp as a neatly formatted message: restaurant name, table number, customer name, each item with quantity and subtotal, any notes, and the total. Nothing missing, nothing to guess.
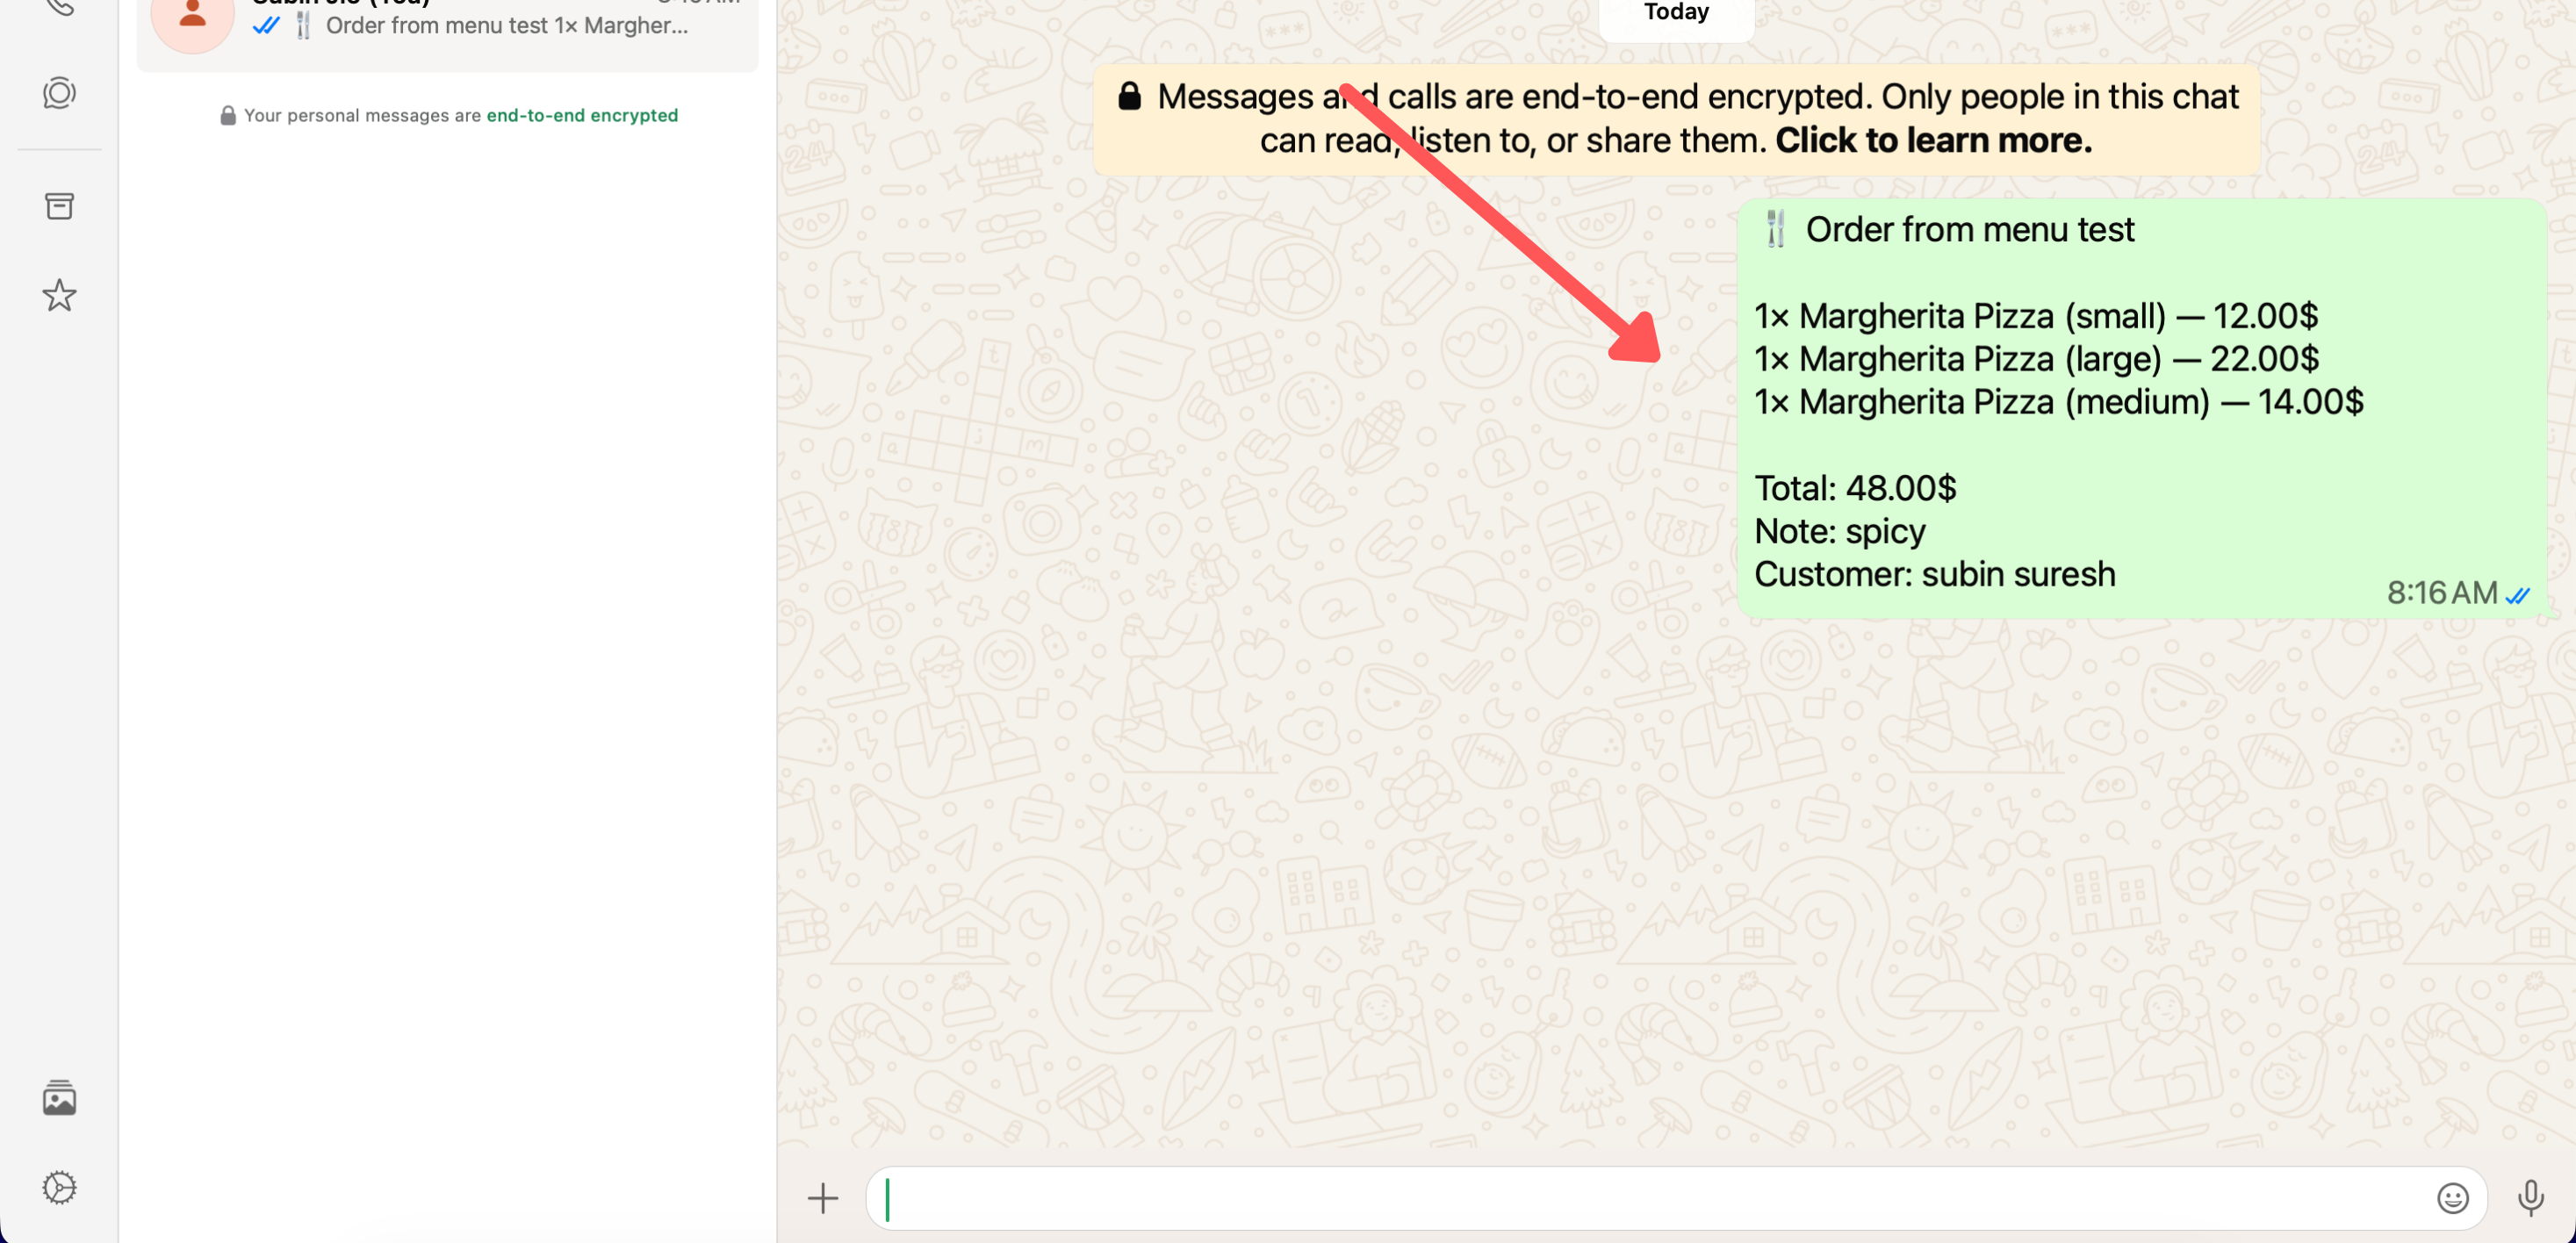
Order arrives ready to read and confirm
Table Numbers - Two Ways
| Option | How it works | Best for |
|---|---|---|
| Customer enters in cart | A table number field is shown in the cart drawer. Customer types their table before sending. | Single printed QR on the wall, takeaway, or mixed dine-in/takeaway |
| Pre-filled via URL | Add ?table=5 to the QR link. When scanned, the table number is locked in and the field is hidden. | Per-table printed QR codes |
Tip
Use your WhatsApp Business number, not your personal one. It keeps restaurant chats separate and lets you set an auto-reply like 'Order received, we'll start cooking!'
Require Customer Name (Optional)
If you want every order to arrive with the customer's name attached, turn on Require customer name on orders. You'll find the toggle directly below Enable WhatsApp ordering in the Restaurant Information section. When on, the cart won't let a customer send the order via WhatsApp until they've filled in the name field.
Tax & Service Fee (Optional)
Restaurants and F&B businesses can add tax and a service fee to the cart. The 💸 Charges panel sits in the Restaurant Information section, just below Require customer name on orders. Both charges are optional, configured per menu, and automatically calculated when customers check out.
| Charge | How it works |
|---|---|
| Tax | Enable and enter a percentage (e.g. 8%). Shown as a separate line in the cart breakdown and in the WhatsApp order message. |
| Service Fee | Enable and choose Percent or Fixed amount. Percent is calculated off the subtotal; Fixed is added as a flat value in your menu currency. |
When either charge is turned on, the cart drawer shows a clean breakdown: Subtotal → Service Fee (X%) → Tax (X%) → Total. The same breakdown is included in the WhatsApp message sent to the restaurant, so there are no surprises at pickup or payment.
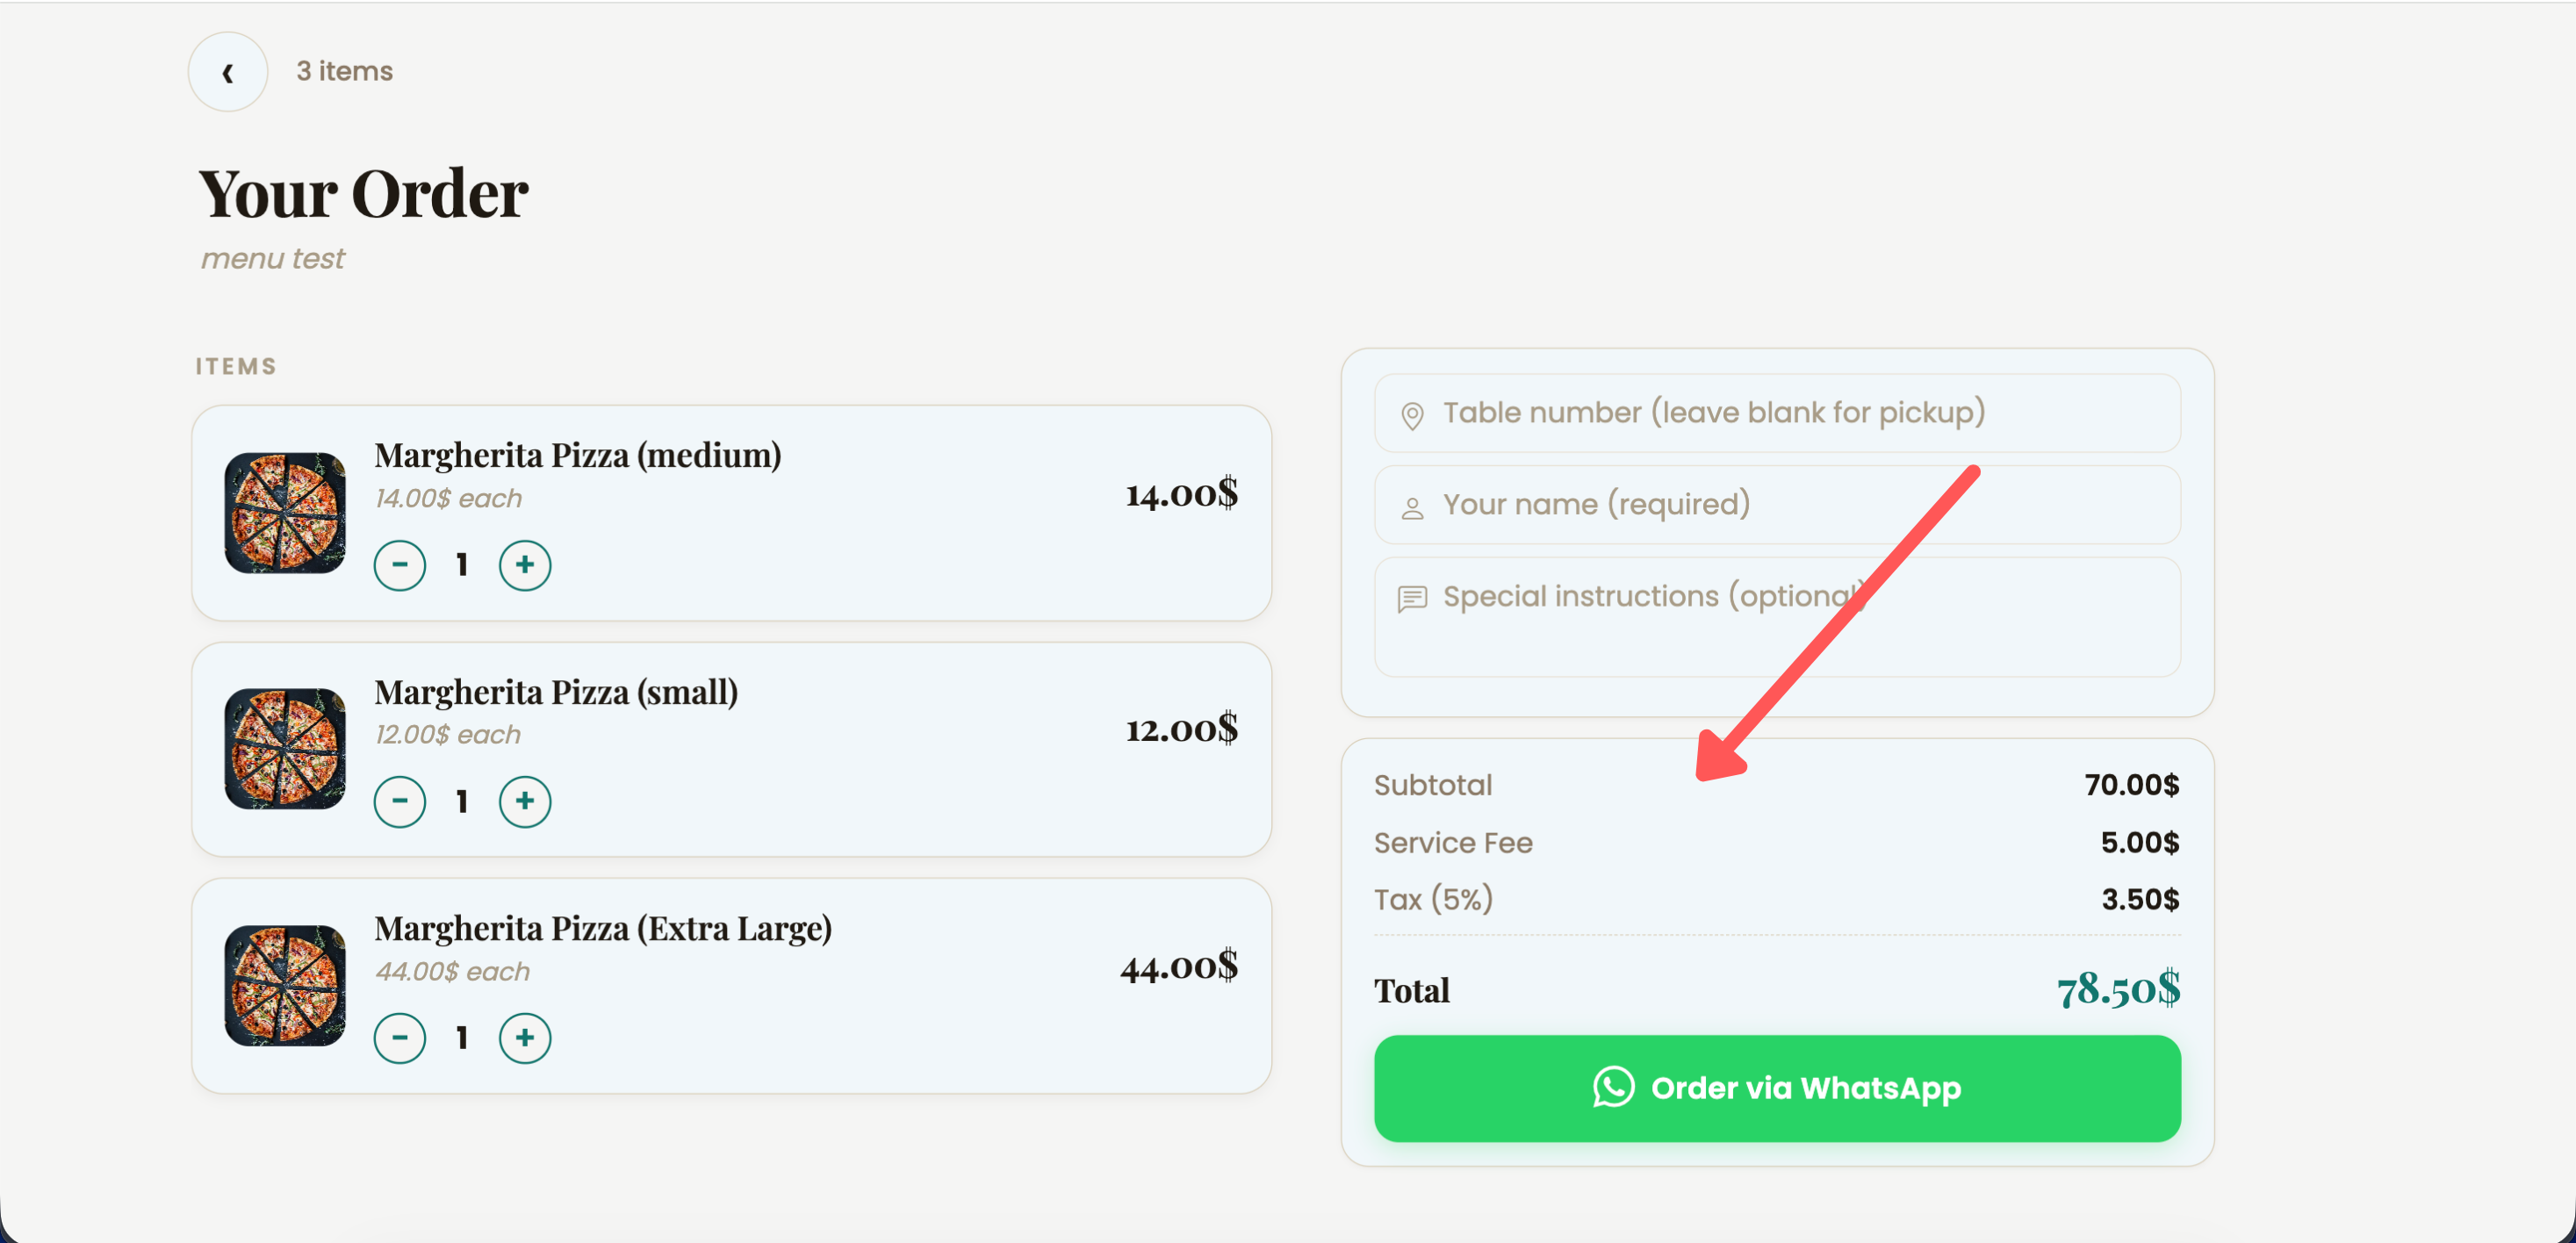
Breakdown appears automatically when tax or service fee is enabled
Home Delivery (Optional)
If you handle your own delivery — your driver, your area, no third-party platform — your menu can collect delivery orders directly. Open the 🛵 Home Delivery panel in the Restaurant Information section (just below Charges), turn it on, set a delivery fee and a minimum order amount, and you're done. One QR now handles dine-in, takeaway pickup, and home delivery — same menu, same checkout, same WhatsApp.
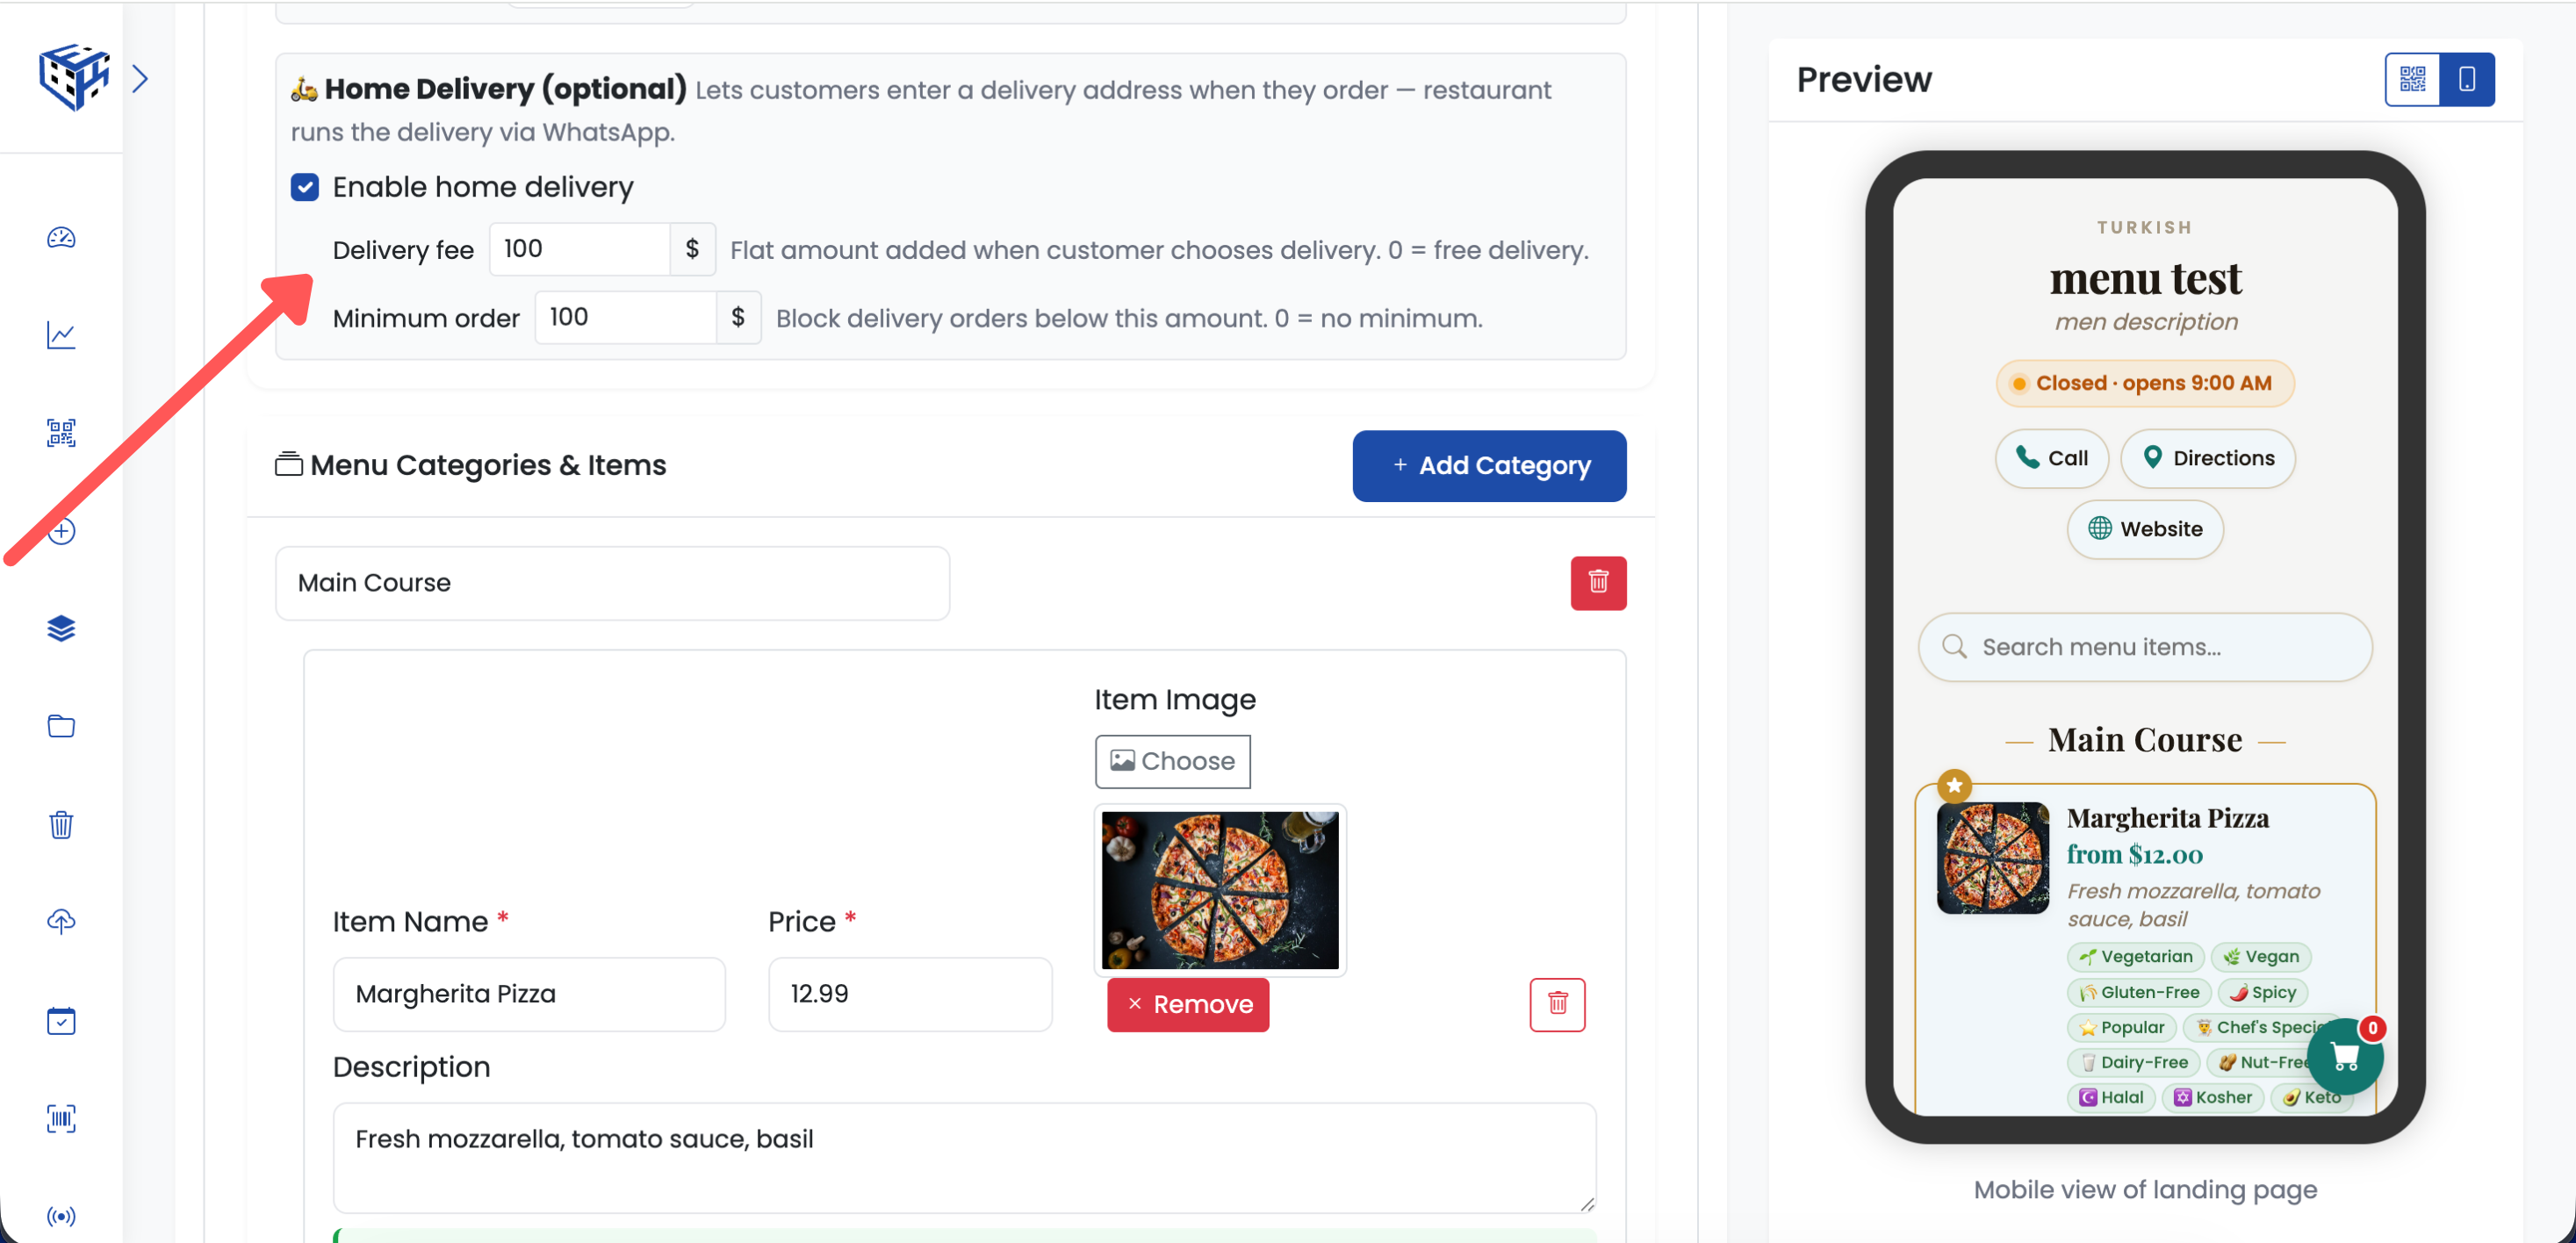
Turn on home delivery and configure your fee and minimum order
| Setting | How it works |
|---|---|
| Enable home delivery | Master toggle. When on, the cart drawer shows a Dine-in / Pickup / Delivery selector at the top. When off, the cart works exactly as before — single-mode, no address, no delivery fee. |
| Delivery fee | Flat amount added when the customer chooses Delivery (e.g. $3, €4, ₹50). Appears as its own line in the cart summary so the total stays transparent. Set to 0 for free delivery. |
| Minimum order | Block tiny delivery runs that don't earn back the fuel. If the cart subtotal is under this in Delivery mode, the Order button locks and the customer sees a friendly note showing the minimum. Set to 0 to allow any size. |
On the public menu, the cart drawer adapts to the chosen mode. Dine-in shows the table number field, Pickup hides it, and Delivery replaces it with a delivery address textarea. The customer's last choice is remembered for next visit, so a regular who always orders delivery doesn't have to pick the mode every time.
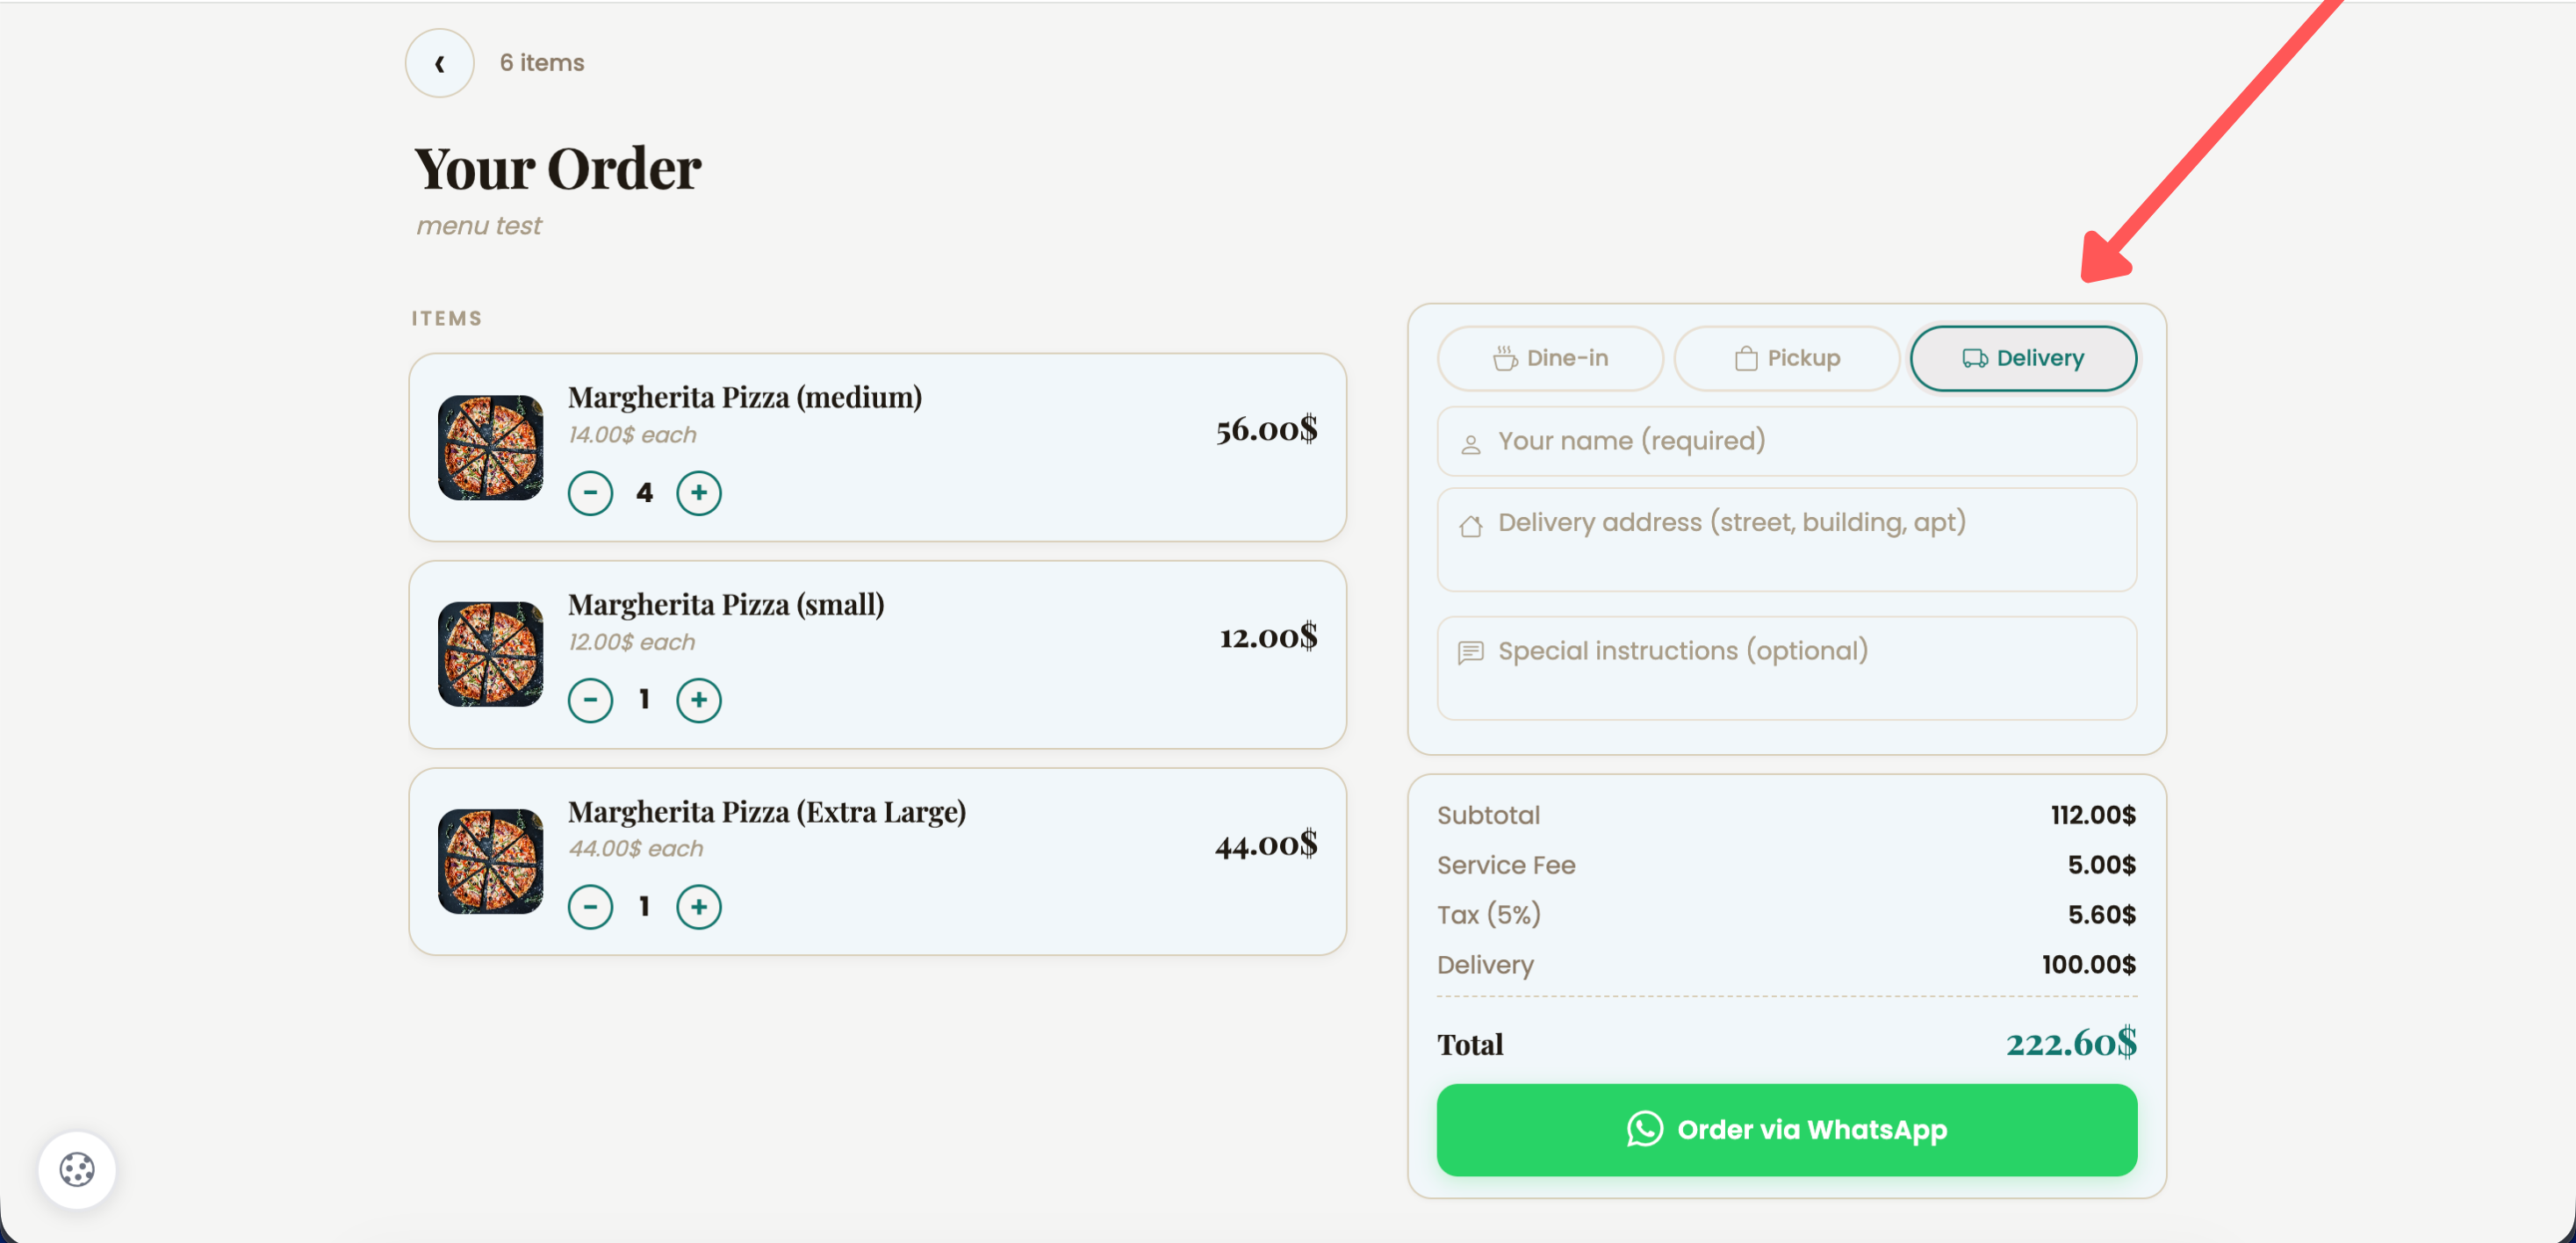
Cart adapts to the selected mode — table for dine-in, address for delivery
The WhatsApp message you receive includes a 📍 mode line at the top (Dine-in / Pickup / Delivery), the delivery address (if applicable), the delivery fee on its own line, and the new total — your kitchen knows exactly what to prep and where to send it.
Tip
Existing Menu QR codes are not affected — Home Delivery is opt-in. Keep it off and the cart stays single-mode exactly as before. Turn it on whenever you're ready.
Page Customization
Every Menu QR can be styled to match your brand. Open the editor and scroll to the PAGE CUSTOMIZATION section at the bottom.
| Setting | What it does |
|---|---|
| Accent Color | Colours the menu prices, the + add buttons, the selected size pill, the Open-now dot, and the hover state on the Call / Directions / Website chips. Ten restaurant-themed presets (Terracotta, Mediterranean Teal, Forest Green, Steakhouse Red, Midnight, Sunset Orange, Coastal Blue, Olive, Burgundy, Espresso) plus a custom hex picker. |
| Background Color | The canvas colour behind the whole menu. Ten soft presets (Warm Cream, Ivory, Parchment, Coastal Mist, Sage, Pure White, Dark Charcoal, Espresso, Blush, Stone) plus a custom hex picker. |
| Gradient background | Toggle it on, pick a second colour and a direction (↘ → ↓ ↗ ↑ ←), and the page gets a soft branded gradient behind all content. |
| Card Color | The colour of each menu item card (image + name + price + button). Also applies to the Pickup Details and Summary panels inside the cart, the opening-hours card, and the quick-action chips. Ten presets plus a custom hex picker. |
| Font | Twelve Google Fonts (Poppins default, plus Inter, Roboto, Open Sans, Lato, Montserrat, Nunito, Playfair Display, Raleway, Source Sans 3, DM Sans, Space Grotesk) used for body text, dietary tags, labels and cart fields. The restaurant name and dish names stay on Playfair Display for the editorial look. |
Auto-contrast: pick a dark background (Espresso, Midnight, Dark Charcoal) and the text automatically switches to cream so the menu stays readable without any manual tweaking.
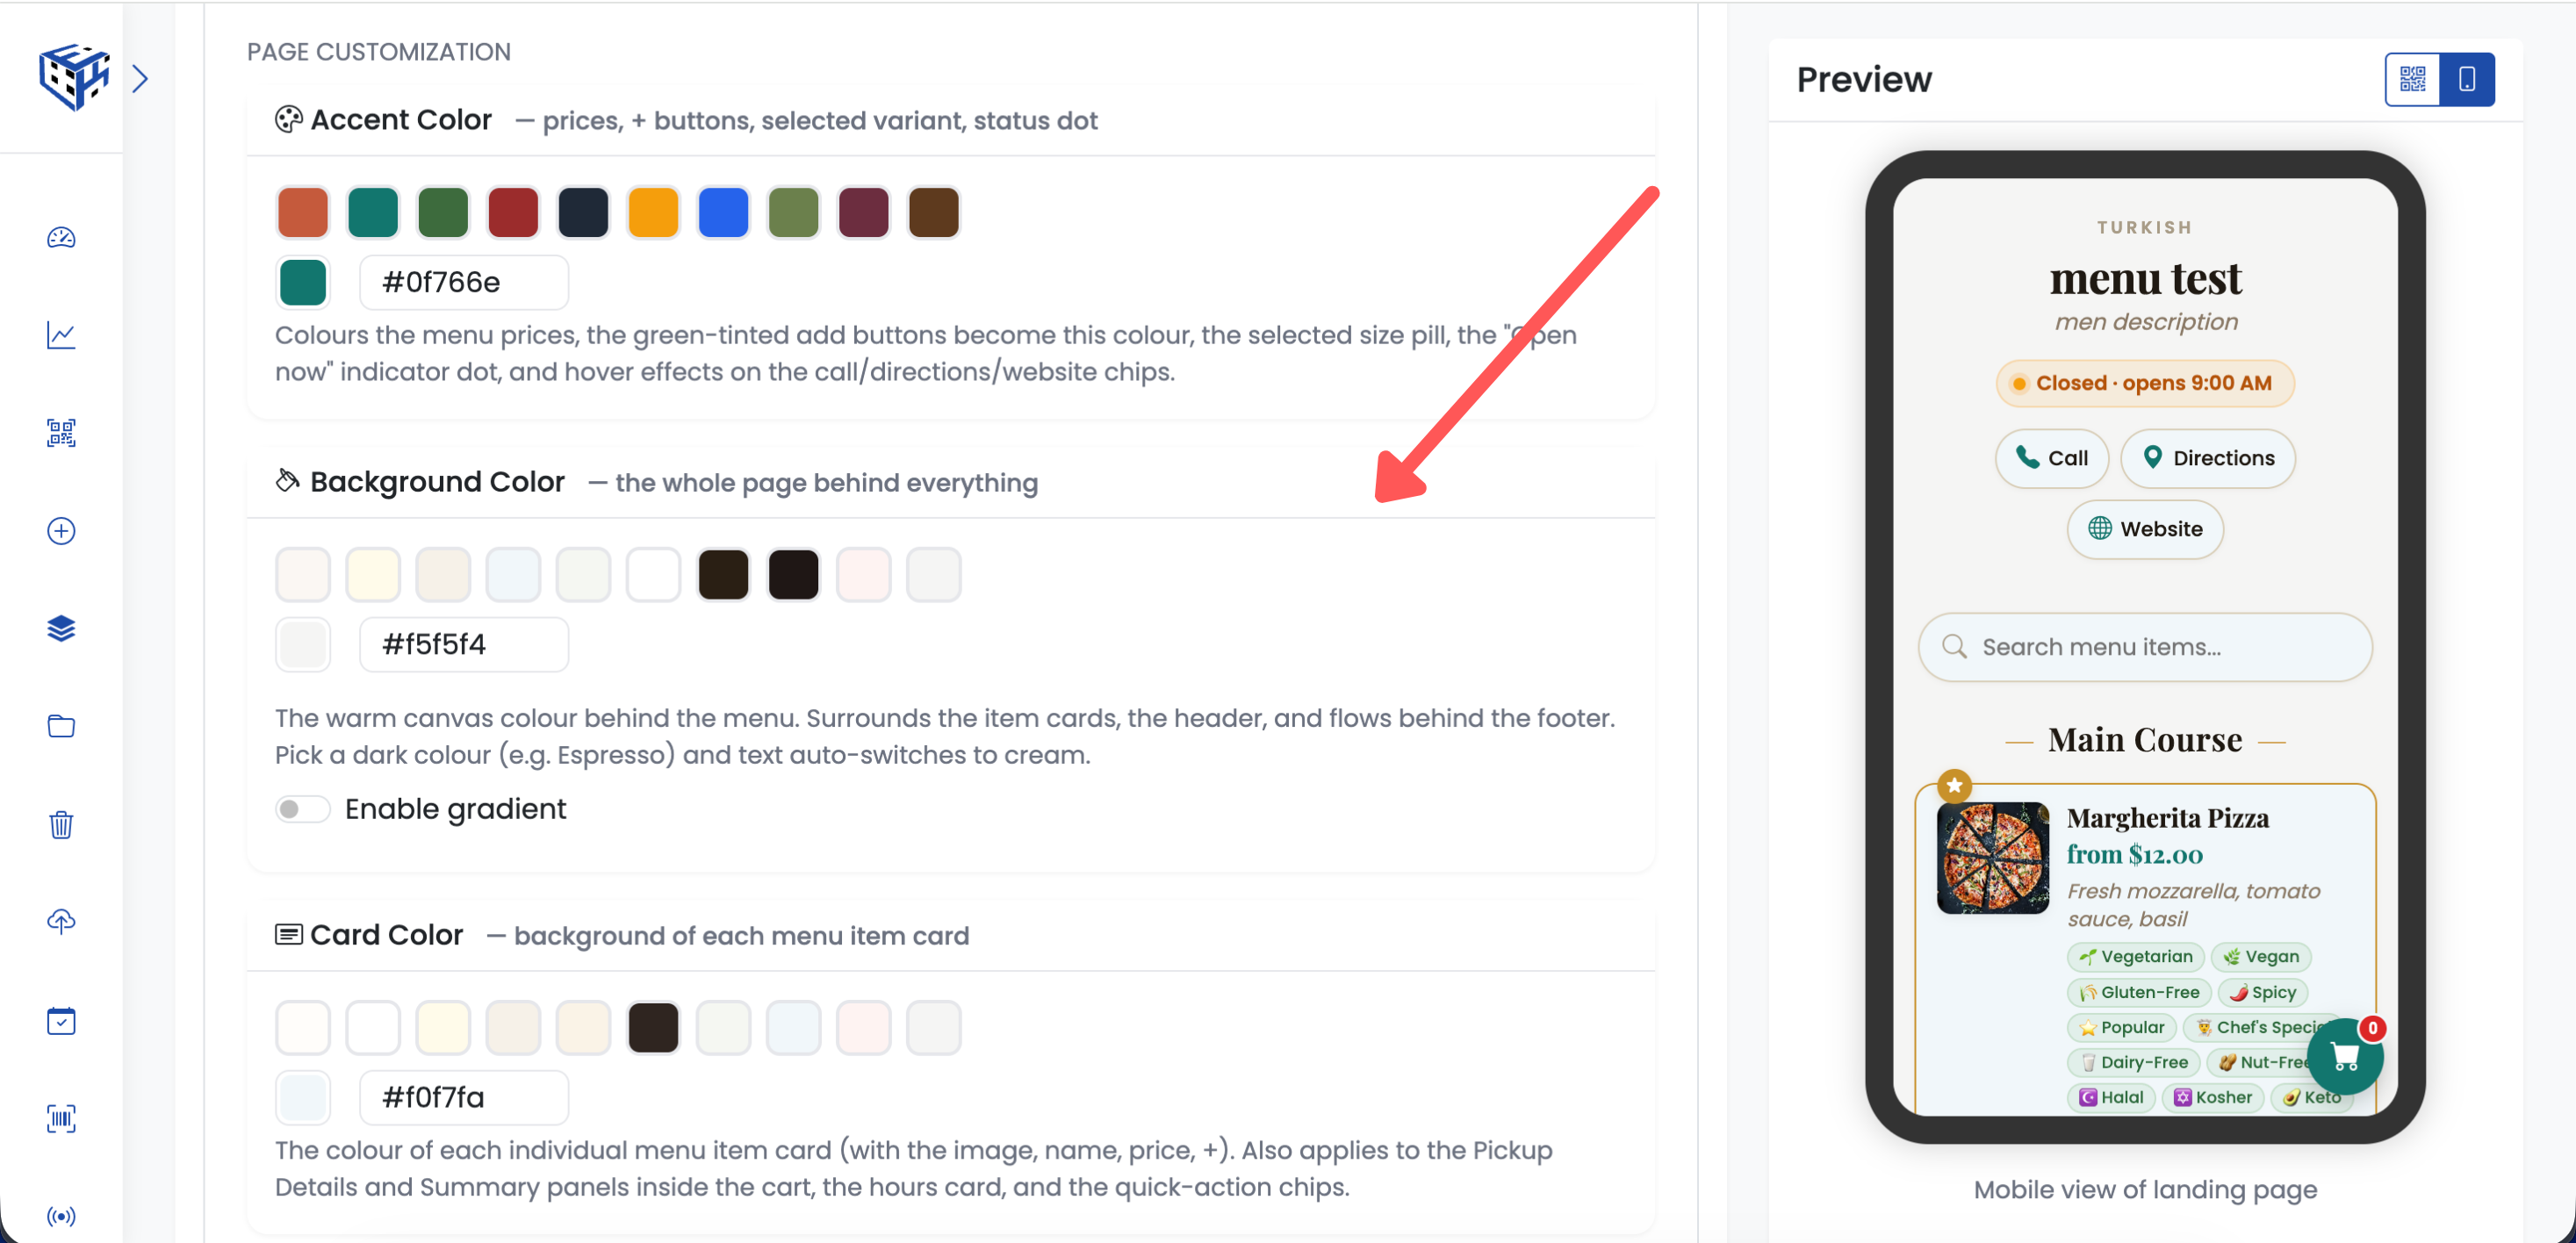
Pick colours and font to match your brand
Contact Information
| Field | Description |
|---|---|
| Phone Number | Restaurant phone |
| Website | Your website URL |
| Address | Full restaurant address |
Opening Hours
Set hours for each day of the week (Monday-Sunday). Uncheck days when closed. Select your timezone — scheduled items and ordering availability use the same timezone.
Split shifts are supported. If your restaurant closes for a siesta or prep break, tap + Add shift on any day to enter a second (or third) range — perfect for venues open for lunch service and dinner service with a break in between. Each shift appears separately on the public menu, and the Open now / Closed status pill correctly reflects whichever shift the customer is currently in (or when the next one starts).
Social Media & Delivery
Add links to Facebook, Instagram, Twitter, YouTube, TikTok, LinkedIn, WhatsApp, Telegram, plus delivery platforms: TripAdvisor, Yelp, Zomato, Uber Eats, DoorDash. The WhatsApp number set here is also the one used to receive orders when ordering is enabled.
Use Cases
| Use Case | Example |
|---|---|
| Dine-in ordering | QR on every table, ?table=N in URL, orders land in WhatsApp tagged with the table |
| Window display | Passersby scan to browse the menu from outside |
| Takeaway bags | Customers reorder next time directly via WhatsApp |
| Flyers | Menu link on promotional materials |
| Food trucks | Compact menu + WhatsApp ordering while in line |
Common Questions
| Question | Answer |
|---|---|
| Do I pay a commission on each order? | No. Orders go straight from customer to your WhatsApp. ElkQR takes nothing per order. |
| Does the customer need an app? | Only WhatsApp (which most have already). The menu runs in any mobile browser. |
| What if I don't want ordering - just the menu? | Keep the toggle off. The cart button disappears completely and it behaves like a plain digital menu. |
| Can I take payment through WhatsApp? | WhatsApp itself doesn't process payments in most countries. Customers typically pay in person, or you send them a payment link after you confirm the order. |
| Do existing Menu QR codes keep working? | Yes. Every new feature - allergens, variants, schedule, ordering - is optional. Existing menus stay exactly as they were until you opt in. |
| Can I add tax or a service fee? | Yes. Open the 💸 Charges panel in the Restaurant Information section (just below Require customer name on orders) and turn on Tax or Service Fee. Set a percentage — or for service fees, a fixed amount. Customers see the breakdown in the cart, and it's included in the WhatsApp order. |
| Do my existing Menu QR codes show the new allergens and tags? | The new labels (Tree Nuts, Crustaceans, Wheat) and the 7 new dietary tags are available to tick on any item, old or new. Nothing is applied to your items until you tick them — existing menus render exactly as before. |
| Can I match the menu to my brand colours? | Yes. Scroll to PAGE CUSTOMIZATION in the editor. Set an Accent Color (prices, buttons, selected pills), a Background Color (with optional gradient), a Card Color for the item tiles, and a Google Font. If you pick a dark background, the text auto-switches to cream so the menu stays readable. |
| My restaurant closes between lunch and dinner. Can I show split hours? | Yes. In the Opening Hours section, tap + Add shift on the relevant day to add a second time range (e.g. 09:00–15:00 and 19:00–23:00). Up to three shifts per day are supported, covering common patterns like breakfast + lunch + dinner. The public menu shows each shift separately, and the Open now / Closed status correctly reflects siesta gaps. |
| Can my menu accept home-delivery orders? | Yes. Open the 🛵 Home Delivery panel in the Restaurant Information section, toggle it on, set your delivery fee and minimum order, and save. The cart drawer now shows a Dine-in / Pickup / Delivery selector. When customers pick Delivery, an address field appears and the WhatsApp order arrives with the address attached. No third-party platform, no commissions. |
| Can the menu show in another language? | Yes. The public menu, the cart drawer, allergen labels, and the Order button all translate based on your workspace's Public Pages Language setting. English, Spanish, and French are supported out of the box. Open Workspace Settings → General → Public Pages Language to change it. Your dashboard language and your customers' menu language are independent — set the dashboard to English for your team and the menu to Spanish for your customers. |
Tip
Add photos to your dishes - menus with images get 30% more orders. Use allergen tags for legal compliance (EU Regulation 1169/2011 requires declaring all 14 major allergens in restaurants). Add a tax or service fee under the ordering section if your region requires them to be shown before checkout.
Still facing difficulties?
Click here to contact our support team for assistance